Pinterest Pin Design 101: Creative Best Practices

Pinterest Pin Design on Pink Background

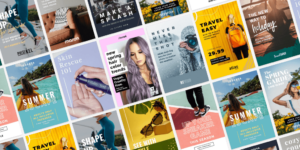
Ready to create Pins that stop the scroll? A Pin design is the first thing that catches the eye on Pinterest, whether it’s good or really bad. That’s why we created this guide – so you can stop the scroll in a GOOD way!

Who’s ready to take Pinterest Pin Design 101? Let’s go over some creative best practices so you can start creating jaw-dropping Pins today!

The Parts of a Pin Design Explained

A Pinterest Pin design has several elements (except for those that are only an image). We will go over each of these in detail below.

anatomy of a Pin design

A Pin design contains the following elements:

  • Image: The main focus on your Pin should be the image. This might be a product image, recipe image, stock image, or a collage of images.
  • Title: The title should showcase your Pin and what it is about. If you can, use Pinterest keywords in your title. Just make sure it is relevant to the Pin.
  • Subheading: A subheading is a great way to add extra text, but try not to be too wordy or add too much. Keep it simple and easy to read as much as possible.
  • Additional Design Elements: Branding elements can be added to the Pin. Maybe you like adding lines, dots, arrows, or other emblems.
  • Branding: Is your brand mentioned on your Pin? Whether it’s a logo, product or URL, make sure your branding is included in your Pin.
  • CTA: Also known as a call to action. Do you want your readers to buy now? Learn more? While you don’t always need a CTA, in some cases it’s a great idea!
[sc name=”create-cta-blue-bloggers”]

Pin Images

The most important part of your Pin is the image. After all, it’s the first thing that people notice! Your Pin image should accurately display your product or what your Pin is about.

When possible, use images with a lot of white space around them. That way, you can add in your elements and text overlays without clutter!

use Pin images with a lot of white space
Created by Simple Pin Media for May Lindstrom Skin

If you can, use your own images to stand out. Stock photos are often used by other bloggers and Pinners in similar niches.

Custom photography will really level up your Pinterest Pin game. That’s because using your own images for your products will build credibility and your audience will be more likely to trust you.

Plus, with creative control of your photography, you can make sure images are shot with Pinterest in mind by shooting images with different angles and lots of white space.

Title

Keep it short and snappy whenever possible! And while you should definitely include keywords, your title doesn’t need to be only keywords.

One of the most important design tips to keep in mind is to leave breathing room in your Pin designs. A long title is overwhelming and makes it harder to fit in all of your text and elements without crowding the image.

Plus, Pins get rounded on the edges in the feed, so you want to make sure you don’t max out the title or copy to the edges of your Pin design. That’s easier with a short, concise title.

And on the topic of fonts: as pretty as they are, you should avoid using scripty fonts for titles and keyword text. The Pinterest visual search can generally read Pin copy – unless it’s script font – so make sure your font choice is helping and not hurting your Pinterest SEO.

Subheading and Copy

While there isn’t a character limit for Pin copy, try to limit your text to a few words, if possible. Make it count by displaying your purpose of you Pin as simply as you can.

The subheading and copy are a great way to connect with your audience emotionally. But don’t forget to use Pinterest keywords so that you can rank in the search engine!

Background

If your Pin design is not a full image, no worries! You can choose a high contrast background so that your image and text are easy to read on mobile.

use a vibrant background on your pin

However, think twice before making your Pin too busy. Minimalist Pin design seems to be preferred by Pinterest – and Pinterest users! Busy designs can distract from your Pins message.

If you decide to use a patterned background, test out backgrounds with vertical flow – like the chevron above. This helps the Pin stand out without jarring the eye while browsing the Pinterest feed.

Remember: aesthetically pleasing designs will stop the scroll. So when in doubt, use color-blocking and clean lines for a Pin design that is on-trend and loved by Pinterest!

Additional Design Elements

It can be tempting to use the many designs, icons, and elements that are available on many design tool platforms. But just because you can use them, doesn’t mean you should!

The less busy the Pin, the better! Using too many design elements can make your Pin too crowded and complex.

Ask yourself, what do I want my audience to understand about this Pin? And then make sure the elements on your Pin are serving that purpose.

One great way to use design elements to highlight an impact point of your Pin is by adding an arrow that points to your CTA.

In working with the Promoted Pins department, arrows are driving click through rates through the roof.

Tina Gammon of Simple Pin Media

Branding

Branding is an important element of your Pin, but it shouldn’t be distracting!

If you’re able to, add your branding to the top half of the Pin. Sometimes the Pin buttons can cover part of the bottom of your Pin, which would make it hard to see your branding.

Created by Simple Pin Media for Replica Surfaces

Point blank, people aren’t going to click on your Pin because of your brand name or logo. So you should always be keeping the focal point of your Pin in mind. Are you sharing a recipe? Tips? Promoting a new product? Your branding or logo should not be taking away from this purpose.

Also remember that if your Pin doesn’t compliment your brand colors, you don’t need to use them! As our own Alisa Meredith always asks, are you on Pinterest for branding or for traffic? ‍♀️

CTA

A CTA is important, so make sure it isn’t obscured in any way in the Pinterest feed.

As to length, CTAs that are two words are usually more effective than longer CTAs. Double the oomph of your CTA by using bold colors or design elements to grab attention and stop the scroll.

create an eye-catching cta on your pin
Created by Simple Pin Media for Hadley Court

How to Audit Your Pin Design For Mobile

Before you hit publish on your Pin, there’s one more thing you should be looking at! That’s how your Pin design looks on mobile.

Why? Most Pinterest users are mobile users, which means the majority of people who see your Pin are viewing it from their phones.

So, it makes sense to check how it looks on your screen before you send it to Pinterest! Look at your design on your phone or shrink it on your screen to the size of Pins as you see them on your phone. Can you still make out the objects and text on the Pin?

Some things look great when you’re designing them on Photoshop, but don’t look good on mobile.

Tina Gammon

Double check that your fonts are not too small or hard to read, your CTA is not being blocked by Pinterest buttons and your Pin looks good on mobile.

Create Scroll-Stopping Pins with Tailwind Create

If this is too much to remember or keep track of, don’t stress. With Tailwind Create, you can create perfect Pins with the click of a button. No need to worry about the small things!

You’ll have access to thousands of Pin templates with Tailwind Create – all designed and curated using Pinterest creative best practices!

Simply upload your image to Tailwind Create, and browse the thousands of Pin designs for your favorites! You can customize each design with design elements, swap out images, and tweak to perfection – or save and schedule your favorite design in one click!

Pin it For Later :

Ready to create gorgeous Pins? Use our easy-to-read primer of Pinterest design tips! You'll be creating Pins that stop the scroll and get clicks in no time.
[sc name=”create-cta-white-ecommerce”]

[sc name=’pinterest-boilerplate’]

How to Rock Minimalist Design on Pinterest

minimalist Pin designs on blue background

Pin designs don’t need to be complicated or over the top. In fact, minimalist design is working better than ever on Pinterest. Imagine: less is more!

Pinterest even says so themselves in their Pinterest advertising guide.

So, are you ready to learn all about about minimalist design on Pinterest?

We’re covering what this design trend is and why it is so successful on the platform.

Plus we’ll teach you how to design a Minimalist Pin in 4 easy steps!

What is Minimalist Design?

Minimalist design is as simple as it sounds!

Design qualities include clean lines, bare, uncluttered images – and only basic ornaments.

Having the subject stand out and speak for itself is the goal without a lot of text or decoration.

“The minimalist approach to design is on-trend and what Pinterest wants!”

Tina Gammon

Why is Minimalist Design so Successful on Pinterest?

Minimalist Pin designs are easy for users to comprehend. Pins that are too busy can be too confusing for Pinterest users, and they’re more likely to tune out the noise and keep scrolling by!

Minimalist design is more soothing to the eye and easy to understand at a glance.

Plus, the overall style is a major trend in everyday life, and Pinterest search trends around “minimalist style” “minimalist decor” and more are immensely popular!

Over the last year, the trend has exploded in Pinterest Pin design.

Here, it shines against the clean modern lines of Pinterest UX.

And the Pinterest Creative Strategy team seems to agree!

The mantra of “less interrupting, more inspiring” can be found in multiple Pinterest creative resources, alongside minimalist Pin design examples.

How to Design a Pin with a Minimalist Approach

Want to learn some minimalist design tips? Great! We’ll go over each element of a Pin and how you can create a minimalist design.

Tina Gammon, Simple Pin Media‘s Creative Director, advises thinking about your design this way:

“I recommend a less is more approach, like going back to your Pin and saying, can I trim this in any way?

How can I get my message pretty straightforward? Do I need these extra design elements – could I just use a text overlay? Can I go for a more streamlined approach?”

Step One: Select a High-Impact, Low-Clutter Image

When it comes to Pinterest design, image is everything.

For the most design versatility, try to use your own images when possible.

By shooting your own images, you have creative control and can easily shoot multiple photos with lots of white space.

White space allows you to balance the Pin, bring your subject into focus and gives you room to design without taking away from your image.

Plus, white space also makes it easier to remove the background of your photos!

“I don’t try to make an image fit, I make things work around the image.”

Tina Gammon

Step Two: Compose Your Pin with Visual Hierarchy in Mind

Composition is where all of our elements are coming together to create a cohesive design. Font, lines, images – all the pieces that add up to something we see in the feed that is beautiful.

Tina Gammon

Visual hierarchy refers to the sequence in which we process an image as we look at it.

Usually, we start in the top left!

Since we focus at the top of an image first, this is a prime spot for important Pin copy.

Try to place it at the top, if the image allows for it!

Place important points of your Pin (image, important keywords, branding) that you want to draw attention to at visual impact points.

But remember, you want to leave the image room to breathe!

Tip: Less is More When it Comes to Pin Copy

A clean and uncluttered Pin may tempt you to remove the text entirely, but you shouldn’t. Text overlays provide context for an image and they’re even read by the Pinterest algorithm!

If you want your Pin to be analyzed and indexed properly, make sure the text can easily be read.

The visual should always speak for itself, but the text copy is great for Pinterest SEO.

Don’t just use a keyword on your Pin as a title – your title should be catchy while presented in a visually appealing way.

Try floating a simple text overlay over the top or bottom of the image to avoid clutter.

What is the Character Limit on Pin Copy?

Trick question – there is no existing character limit for copy on a Pin! However, you should always be designing your Pin for the image, not the word count!

“I spend as much time on Pin copy as I do on design. Pinterest SEO is very different than Google. We’re reaching people on an emotional level, not doing cold SEO.”

Tina Gammon

Step Three: Keep Your Branding Subtle, But Present

Pinterest advertising guidelines suggest placing logos and branding elements in the upper half of the image.

This is for a few reasons, the first being the visual hierarchy we talked about above. The second is because any non-standard Pinterest Pin sizes may be cut off in the feed display.

Finally, the Pinterest visual search button appears over the bottom right corner of your Pin when a user clicks on it, and any Pinterest browser extension buttons will also appear at the bottom of the image.

These can obscure your branding if it isn’t placed in the right spot!

Less is more when it comes to Pinterest Pins, and that's where the minimalist design trend can help! Learn tips, tricks, and creative best practices in our latest post.

Watch: The Inside Scoop on Pinterest Design That Works

Want even more Pinterest design tips to take your minimalist Pins to the next level? Grab your notebook and watch our Facebook Live with Jeff Sieh, Alisa Meredith and special guest Tina Gammon!

Create Minimalist Pinterest Pins with Tailwind Create

The new Tailwind Create tool allows you to create quality Pinterest images with clean lines and a minimalist feel at the click of a button – no designer required!

Plus, there are plenty of other Pinterest design styles to customize with your branding and make it your own!

Tailwind Create Pin Design Tool

[sc name=’pinterest-boilerplate’]

The Ultimate List of Pinterest Creative Resources

Pinterest Creative Resources

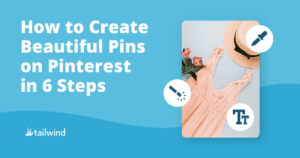
Looking for your latest dose of tips, tricks, and best practices for creating beautiful Pins on Pinterest?

In today’s post, we’re sharing our favorite go-to guides, webinars, and presentations to help you learn what to do (and not to do!) when you create a Pinterest Pin!

Take a look at the list below, and make sure to bookmark this post (and the materials inside!) to have the ultimate Pinterest reference guide right at your fingertips!


Pinterest Creative Agency Advertising Guide

If you’re looking for a way to connect with your audience on Pinterest, this handy Creative Agency Advertising Guide from Pinterest is a great place to start.

From practical ad specs to stats you’ll want to know, this bite-sized primer helps you think about finding your audience in a new way.

Pinterest Creative Agency Advertising Guide

Our Favorite Highlights:

  • The Five Dimensions of Inspiration – a handy way to frame up the creative direction of your Pin design
  • Amazing insights about why Pinners are on Pinterest and what content mesmerizes them.

Pinterest Creative Best Practices Webpage

Pinterest Creative Best Practices

Your Pinterest creative is sure to perform better when it matches Pinterest Creative Best Practices. Handy tip: bookmark this page – it’s updated with the latest information for Pinterest success.

Our Favorite Highlights:

  • Pinterest image size and copy tips for Standard Pins, Video Pins, and Story Pins
  • Length tips for Video Pins and Story Pins
  • How to brand your Pinterest creations in the best way

Pinterest Creative Best Practices Presentation

Pinterest Creative Best Practices Presentation

While the web page above acts as a constantly updated overview of current creative best practices on Pinterest, you can dive a little bit more into the weeds with the Creative Best Practices presentation from Pinterest.

This master doc contains an in-depth look at each of the main topics for creative, including images, branding, copy, and more!


Everything You Need to Know to Succeed on Pinterest Webinar

The title says it all – our own Alisa Meredith put together a free webinar detailing everything you need to know to succeed on Pinterest!

Spanning creative and design tips, Pinterest SEO research, and more, this webinar is full of tips you don’t want to miss!

Our Favorite Highlights:

  • What to do (and what not to do) using real Pin examples
  • Incredible formulas to put your content in context and increase traffic
  • How to strategize Pin creation for high performance

[sc name=”everything-pinterest-webinar-image-cta”]


Breakthrough Video on Pinterest Presentation

Stumped on how to create engaging Video Pins? You’ll want to keep this little goldmine in your back pocket.

Breakthrough Video on Pinterest Guide

The Breakthrough Video on Pinterest guide details six elements to keep in mind when creating Video Pins and Pinterest Ads. It also includes nine video styles – with examples – that will inspire your next video Pin.

Our Favorite Highlights:

  • A quick explainer of six elements of a scroll-stopping video – perspective, white space, color, movement, motion & depth.
  • 9 technique tutorials for videos – with examples!

Pinterest Academy: Create Inspiring Content

The Pinterest Academy is a go-to resource for all things success on Pinterest, but the Create Inspiring Content course is a standout for creatives.

Pinterest Academy: Create Inspiring Content

Signing up for the Academy is free, and you’ll learn a ton of best practices, whys and hows in these bite-sized lessons.

Our Favorite Highlights:

  • Tips to identify the audience you’re creating Pins for
  • Do’s and Don’ts for creating and Pinning that are handy to know
  • Ways to increase CTA and create a pleasant user experience from your Pin to your website!

Pinterest…on Pinterest!

Our go-to spot to see Pinterest creative that works and get inspiration for design is on Pinterest, of course! There are tons of Pinterest Boards to follow for inspiration, including those created by Pinterest themselves.

Check out these two Pinterest profiles curated by the Pinterest Creative Strategy team to see what success looks like (literally!) on Pinterest.

Pinterest Creative Gallery

Handily organized by theme, the Boards on Pinterest Creative Gallery’s Pinterest page give you a look at successful Pins and campaigns around a variety of themes, occasions and events.

For example, the Fall Football/ Tailgate has Pinterest Board sections for industry niches like Restaurants, Auto, and Financial Services!

Pinterest Creative Gallery Pinterest Profile

Creative Strategy at Pinterest

Like the Pinterest profile name suggests, this collection of Boards helps you understand and envision strategy by industries and niches.

In many of the Boards, you’ll find sections titled “Awareness” “Consideration” and “Action” to show you campaigns and Pins with the strategic goal behind them!


The Pinterest Business Youtube Channel

Pinterest is on Youtube, and their presentations can really help guide your creative strategy on the platform.

The Pinterest Business Youtube channel covers topics important to businesses, from holiday campaign inspiration and how different demographics interact with the platform, one of our all-time favorite videos is the “What’s Get Creative on Pinterest?” webinar!

The webinar covers how consumers think about brands on Pinterest, the art and science of making great Pins and tips for each creative objective!


Tailwind Create

Need a little help fine-tuning your Pin designs? We’ve created the perfect resource to help you create jaw-dropping Pins – no designer required!

Tailwind Create allows you to generate, personalize, and fine-tune dozens of designs in one click.

Want to test it out? We’re now accepting Pinners into our public beta. In exchange for early access to this game-changing tool, we just require two things:

  • You play around and experiment in the tool for at least a few hours, generating gorgeous images
  • You give us your time (and opinions!) in a 30-minute call with our development team.

Interested? Request early access to the Tailwind Create beta now!

[sc name="create-cta-blue-bloggers"]

How to Create Beautiful Pins on Pinterest in 6 Steps

How to create pin on pinterest on blue background

If you’ve spent any time on Pinterest, you know that it’s all about beautiful Pinterest Pins. And if you’re like many Pinners, you’ve spent more time looking at all those Pins than you have adding your own Pins!

Pinterest favors new, exciting, fresh content in the algorithm. Why is that? Because users love it! A good experience on Pinterest is good for everyone. And because sharing content that’s already been on Pinterest is easier than creating new content, you’ll be at an advantage if you can give Pinterest that new, inspiring content on a regular basis!

So, keep reading to learn how to make a Pin on Pinterest that will wow Pinners.


Wish everything you need to know about Pinterest was in one spot? It is – in our latest FREE webinar! From tools, traffic-driving tips, and the secret to creating irresistible Pins – you’ll find it all inside.

[sc name=”everything-pinterest-webinar-image-cta”]


Why You Should Make Pinterest Pins

  • Pinterest favors fresh content – just make sure each one is unique and additive, showcasing your product, service, or information in a new way and for a different audience and search – focus on quality over quantity.
  • Build your brand and set your Pinterest account apart from your competitors and communicate who you are – but don’t be afraid to experiment with different styles.
  • Create resources for your community – You can create a bulletin board of useful information – all with your Pinterest profile!
  • Gain search traction on one of the biggest search engines on the planet – At last count Pinterest had 416 million users per month.
  • Grow traffic to your website or blog – Use compelling Pins to advertise your core site or product to your target audience
  • Sell your products or services – People are on Pinterest to be inspired and to find what they need to create a life they love!
How to Create Beautiful Pinterest Pins

[sc name=”cta-text-pinterest-traffic-guide”]

Two-thirds of all Pinned content is from a business website, so make sure that you’re adding Pins to your website or blog to make your content shareable.

Now that you’ve seen the value of original and carefully curated Pins, here are six steps on how to create a Pin on Pinterest that will earn shares and win over followers!

Step 1. Consult Our Pinterest Pin Size Guide

Let’s start with the basic size dimensions for creating a Pin.

Pinterest’s preferred image aspect ratio is 2:3 or 1:2.1. The minimum width of a pin is 600 pixels although the ideal is 1000 x 1500 for high- quality, unblurred Pinterest Pins.

Curious why that is? Here’s what Pinterest has to say on the topic:

“Pins are organized into columns, so vertical Pins take up more space and tend to stand out more.

Don’t make Pins too long or they will get cut off. The ideal aspect ratio for a Pin is 2:3.”

Pinterest

Although 2:3 is the ideal, you can still experiment with Long Pins at 1:2.1.

This is an approved size from Pinterest, while many infographic Pin sizes are not! Anything above 1:2.1 risks getting cut off in the feed (like the example below!)This Pin looks fantastic on desktop but the bottom of the image gets cut off on mobile.

Romantic Vacation pin examples
Image cropped on mobile

Above is the Pinterest app view on mobile with the bottom cut off. While it isn’t essential for this particular Pinterest Pin, cropping could hide valuable branded information.

If you put your watermark or logo in the bottom corner, for example, that would only be revealed when a user clicks on the Pin.

That’s why it’s so important to make informed decisions when you create your Pinterest images.

Need more guidance? Skim our Pinterest Pin Size Guide!

Pins on Pinterest

Tall, vertical images look great on Pinterest so if you do choose one of those long Pin sizes, feel free to experiment.

For example, you could collage images with multiple photos showing steps for a DIY how-to project or a recipe! People love to share these helpful Pins to their Pinterest Boards.

Step 2: Source Pin Images That Inspire…

Pinterest is the ultimate wish list. People Pin and repin things they like and want.

So think of your Pinterest Pins as your visual portfolio, and make your images as appealing as possible.

Remember that your goal is for your content to be saved alongside someone’s hopes and dreams on their treasured Pinterest Boards. It might seem like a tall order, but with a few skills, you can create a Pinterest post that’s highly shareable.

Just make sure that you have permission to use any images that you find for your blog or your social media posts. If you can’t afford images, you can’t afford the fines that you could incur for using photos illegally! 

So much handy information! You should Pin this article for later.

Don’t believe us? Our Director of Marketing once got hit with a $500 bill from Getty Images for inadvertently using one of their images in a blog at a former job!

Luckily, there are many sites that you can find free images to use. Two of my favorite sites to use when creating a pin are Librestock and Unsplash!

Step 3: Or Take Your Own Beautiful Pinterest Images!

The professional quality images we find on stock photography sites like Unsplash can be a very handy resource for Pinners (especially for those jaw-dropping inspirational Pins.)

But Pinterest’s algorithm favors new content and fresh images, and frequently used Stock images aren’t very original.

If you want to create images for Pinterest but you’re not a professional photographer and you don’t have a fancy camera, don’t worry. 

Smartphones have come a long way and are one of the most easily available and powerful tools at your disposal to create beautiful Pins.

Here are a few ideas that are easy to use when taking Pinterest images on your smartphone:

  1. Pay close attention to the light – diffused light (think: overcast day) will minimize shadows.
  2. Try a black and white edit of your photo. These can really stand out against color-saturated Pins.
  3. Play around with cropping to highlight a part of your image or to create more white space. 

Need more ideas? Check out our FREE webinar all about smartphone photography!

[sc name=”ivory-mix-webinar-evergreen”]

Step 4: Experiment with Your Pin Visual Style

Part of your master plan for creating beautiful pins is designing a brand that people love and gravitate towards.

Keep in mind that branding on Pinterest is a little different than branding on Instagram.

The reason being, most people won’t see all your Pins side by side constantly. So, you can feel free to experiment with color palettes and font styles to find out what Pinterest users in your niche like to see!

One thing you should always do, however, is add your logo and branding to your Pinterest image so people can recognize your Pins in their feed.

And don’t forget to design your Pins to be mobile-friendly!

How to Make Your Pinterest Pins Mobile Friendly

Here’s what Pinterest has said about creating a Pin that’s mobile-friendly:

“People are spending more time on their mobile phones than ever before, and we’ve seen this shift at Pinterest, too. That’s why we think Pinterest is a great place to reach, inspire, and convert people on mobile.”

In fact, 75% of Pinterest usage is happening on mobile devices!

So it makes sense that your images are mobile-friendly.

What exactly does this mean?  

Your image should be clear and your text easy to read on a mobile device. Make sure you add text on high-contrast backgrounds, so people can understand what your Pin is about from any size screen!

Try Pinning your image and then checking it on multiple devices to see if it’s looking good.

Step 5: Create Images for Pinterest Search

Don’t forget that Pinterest has its own search algorithm! That means understanding the basics of Pinterest SEO is a must, so you can learn how to create images for Pinterest search result success.

When you create Pinterest images, optimize your Pin descriptions with relevant keywords and phrases. Pinterest search covers your title, description, image, and even the text on your Pin!

Add ALT text to each image on your blog for search

Pinterest’s visual search scans the image and groups it with related images.

Here’s how to make the most of your Pinterest images:

  • Name each image using keywords for your article
  • Choose relevant images that easily relate to the topic of your Pin
  • Keep the text on your Pin closely related to the topic, incorporating 1-2 main keywords

Step 6: Highlight Your Offerings in Your Pin

Pins stand out when they’re inspirational and “on brand”. Here are a few more ideas about how to create content for Pinterest that makes the most of your brand and showcases your products and services in the best light!

Put your product or service front and center in the image. Don’t make Pinners guess what a Pin is about. Depending on your aesthetic, include your logo as a prominent feature, or use subtle branding, to build awareness and trust.

The goal of optimizing your Pins is to help people discover what you offer so don’t be afraid to highlight the benefits of your brand or product.

Words like “homemade,” “easy,” and “sustainable” make it clear what you are offering.

If possible, show your product or idea in action. And don’t hesitate to include a call to action on the Pin (“shop now,” “discover your look,” etc.) where appropriate.

Want some help bringing this all together? We have a Pinterest Templates Toolkit to help you create the perfect Pin for your brand!

[sc name=”cta-image-pinterest-toolkit-2″]

Learn How To Market Your Gorgeous Pins

Creating gorgeous Pins has never been easier! So many resources, tools, and strategies are available to help you create content for Pinterest.

Pinterest Marketing should be an important part of your overall strategy.

If you are a business owner looking to gain more visibility for your Pins, check out our Pinterest for Business webinar!

And for a simple guide to substantial sales growth from Pinterest see Grow Your Online Sales with Pinterest.

infographic- how to create pinterest pins

[sc name=”pinterest boilerplate”]

11 Tips for Taking Pinterest-Worthy Photos with Your Smartphone

Can you believe it’s been nearly TEN years since Pinterest first appeared? Since then, content creators and users alike have added well over 200 billion images – all competing for the attention of 322 million monthly active users.

Ten years is an eternity in internet time, so the Pinterest images that generated traffic and engagement then might not work so well today – and with competition increasing daily and with fresh content taking off on Pinterest, well, it seemed a good time to take a look at what works NOW in Pinterest images, and how YOU can take the best images for your own content.

After all, while you certainly CAN use stock images, there’s no better way to stand out than with one-of-a-kind images you take for yourself. With your smartphone. No fancy equipment required.

[sc name=”cta-text-pinterest-toolkit”]

Watch the Facebook Live with me, Jeff Sieh, and Kayla Butler.

1. Incorporate Seasonal and Everyday Moments Into Your Pinterest Images

Why this works: Pinterest is the place to be inspired and to envision the best version of yourself, your home, family, job, hobby, and so on. When you can tap into what’s on people’s minds in the moment – how to make mealtime more enjoyable, how to reach fitness goals, how to wow at your next social event, or how to how to enjoy a special moment with your kids, you move people to action.

Aligning your Pin images with seasonal and everyday moments can lead to a 22% increase in online sales.

How to do it: When shooting photos for your products, place them in a variety of seasonal or moment-based settings. Show them in use and from multiple angles (this will also help you have a larger selection of images to share later!).

You can rely on your text on image to frame the event or season, but if you can incorporate it in your images, the effect may be more powerful. You can also try using stock image backgrounds in seasonally-appropriate colors for your Pins.

For example:

A Pin where the text on image specifies the “everyday moment” – breakfast time!

An everyday moment that needs no explanation:

2. Add a Personal Touch with People or Pets

What? Isn’t the first rule of Pinterest images “no faces”?

Trends change! While you’ll still see a lot of fashion images where the models are headless save for a chin, images are popping up with families, kids, couples, and critters. And apparently it’s working – because Pinterest is recommending we give it a try.

Why this works: This helps a Pinner see themselves, their family, or their pet in a setting where your product or service is enhancing their lives.

Campaigns that show someone using the product or service are 67% more likely to drive offline sales lift. Pinterest

How to do it: Enlist family, friends, and pets to pose or find the perfect photo online. Remember to take multiple shots for many image opportunities, and remember tip #1 – tie it in to a season, event, or everyday moment (or two)!

For example:

3. Use Beautiful, Eye-Catching Images that Highlight Your Product

Why this works: It’s kind of there in the heading. 🙂 We love beautiful, and eye catching can stop the scroll. Making sure your product is a focal point makes it obvious what the Pin is about and builds awareness.

When your product is featured prominently in the Pin, it’s 20% more likely to drive more offline sales.Pinterest

How to do it: Make your product the hero of the image with all other elements in support of it. While you can (and should) show your product in use, draw the eye to the product itself.

For example:

[sc name=”cta-image-pinterest-toolkit-2″]

4. Take Striking, Bold Images that Arouse Curiosity

Why it works: Attention-grabbing, yes, but if you can capture the kind of a attention that makes someone want to learn more, that’s where you’ll grow your Pinterest traffic. This is not to be confused with using click-bait headlines; rather, employ a bit of intrigue with your imagery!

Images that we can not interpret at first glance invite us to engage with them.” – Adobe Spark

How to do it: Create a little mystery with your image. What’s the backstory? What’s around that corner? Why is he smiling?

For example: Who is this woman waiting for? Oh, I like that outfit! 🙂

5. Try Black and White

Why it works: In a sea of saturated images and bright colors, the rare black and white image can catch the eye.

Busy, colour saturated pictures can confuse the eye—sometimes there’s simply too much going on. Black and white images on the other hand can seem refreshingly simple and it’s often easier to see and interpret the main focus of the picture.” – Headshot London

How to do it: Almost all photo editing programs have a simple option to transform a color photo to black and white, but you might have better success if you take your photo in black and white mode to begin with. Starting with that view as you compose the photo will lead to better composition and lighting choices for the desired final image.

For example:

6. Include a Bold Pop of Color

Why it works: A surprisingly-bold pop of color can stand out in the feed. If this feels like a contradiction to tip #5, just remember it’s all about testing and variety. Try it all!

When you hear somebody use the expression “those colors really pop,” what he’s talking about is not necessarily just bright colors, but colors that seem to leap off the page (or the computer screen). That is, colors that are the first things you notice when you look at an image.” – Digital Photo Secrets

How to do it: Add brightly-colored accents to your photoshoot (think a bright flower, scarf, pillow, etc.) or choose stock images with highly-saturated areas.

[sc name=”cta-text-pinterest-traffic-guide”]

For example:

7. Use a Minimal Approach to Product Images

Why it works: There can be no doubt what this Pin is all about! While lifestyle photos may convert better overall, someone who is looking to purchase sooner rather than later may be drawn to these straight product shots.

“The aim with minimalist photography is to isolate your main subject, and this is usually done by ensuring that the subject has a lot of empty space around it.”iPhone Photography School

How to do it: Simple staging, clean backgrounds, plenty of white space (that doesn’t need to be white), and impeccable lighting are your friends here.

For example:

8. Get Creative with Repeating Patterns

Why it works: In a feed that can appear random, patterns draw the eye. We can hardly look away!

“While repetition in the humdrum of daily life can at times be a little boring – capturing it in your photography can create an image with real impact.”Digital Photography School

How to do it: Look for patterns in everyday objects. Capture and use these images as background images for your Pins. Or use your products to create a pattern in a photo.

For example:

9. Play with Texture

Why it works: Minimal design doesn’t always mean a white background! Textures add visual interest and an artistic flair.

The viewer should be able to almost feel the texture. Sometimes it’s all about finding a creative angle to make the photograph.” – Digital Photography School

How to do it: Look for unexpectedly-interesting texture in fabric, stones, even paper and glass. Use these as a background for product shots. Or, get up close. Use the macro setting on your smartphone camera to create an unexpected backdrop for your product or a simple but unique text-on-image Pin.

For example:

10. Leave Some Empty Space

Why it works: Leaving some room allows for space for text. Adding text on your Pin can help increase engagement and clicks as it gives Pinners more context about your Pin and the page it links to. It also gives Pinterest more keywords to help them distribute your Pin in search results.

“Your Pinterest pin images should help tell the story of your article, recipe, or craft that you’re sharing. The image is a breadcrumb leading to the main meal, and people don’t want a surprise when they get there.”Peg Fitzpatrick

How to do it: Take your photos a little further back than you think you need to. You can always crop out any extra white space later.

For Example:

11. Try a Flat Lay

Flat lays are popular partly because they’re often not industry/topic specific, so they’re a great choice for service providers and bloggers in particular. They’re also useful for showcasing a collection of items.

Why it works: Simple and clean, the typical flat lay has no shadows and while it has plenty of visual interest, giving an unusual perspective, there’s usually space to add text on the image.

“In marketing, advertising, and blogging – [the flat lay] works as a magical visual that demonstrates a lifestyle and transports your audience into the screen from the photographers perspective.” Ivory Mix

How to do it: Experiment with props on a textured or plain white background. Coffee cups, flowers, laptops, ribbons, and pens are common flat lay props. Arrange your lighting so that there are few shadows and shoot the photo from directly above. Try taking a few on the diagonal and some with more white space for flexibility in editing later.

For Example:

[sc name=”Ivory Mix Photography Webinar Image CTA”]

How to Take Great Pinterest Images with Your Smartphone

Taking great Pinterest images has more to do with planning and perspective than with fancy equipment! Using just your smartphone, natural lighting, and some creativity, you can get more traffic and engagement with every Pinterest image. Here are 11 fresh approaches to try:

  1. Incorporate Seasonal and Everyday Moments Into Your Pinterest Images
  2. Add a Personal Touch with People or Pets
  3. Use Beautiful, Eye-Catching Images that Highlight Your Product
  4. Take Striking, Bold Images that Arouse Curiosity
  5. Try Black and White
  6. Include a Bold Pop of Color
  7. Use a Minimal Approach to Product Images
  8. Get Creative with Repeating Patterns
  9. Play with Texture
  10. Leave Some Empty Space
  11. Try a Flat Lay

Keep your Pinning optimized, organized, and always on with Tailwind. Get a [sc name=”free trial of Tailwind for Pinterest”]. No credit card required.

[sc name=”create-cta-white-ecommerce”]

Pin it for later:

How to Make Irresistible Pinterest Images in Seconds [Free Templates]

Maybe you’ve heard about all the traffic people are getting from Pinterest and you’re wondering – how can I get some of that – without adding to my already too-long to-do list?!? 

The secret to Pinterest marketing success is simple – it’s about the images. Yup, it’s all about the design, the text overlay, the description, and even the quantity of images you create!

The best news is that you when you learn to create high-performing images for Pinterest FAST, you don’t need to have a huge backlog of content to see results. You don’t need a degree in design. And you DEFINITELY don’t need to spend hours and hours on Pinterest marketing every week for it to pay off. 

Let’s get down to how to make irresistible Pinterest images in seconds. It’s so easy, you’ll be an image-creating machine, taking over the Pinterest feed with image after image that Pinners are powerless to resist!

[sc name=”create-cta-blue-bloggers”]

What Makes an Irresistible Pinterest Image? 

It’s part art, part science, all fun! Remember, people are on Pinterest to open to new ideas and products and are excited to find inspiration as they search and browse. Pins help people decide what to do and buy next – planning their best future, sure, but looking for items and ideas to help improve their day-to-day lives TODAY.

Pinterest analyzed over 21,000 Pins across several verticals to look at over 25 attributes on each (whether it had a logo, whether the Pin shared a new product, etc.) to find out what was consistent across Pins that generated awareness, email signups, and online and offline sales. What they found can help you create the perfect Pin.

How to Make Irresistible Pinterest Images:

  • Using a striking visual – a professional, in-focus image where your product or service is the focus.
  • Emotional resonance – make a connection by providing inspiration and information.
  • Branding – add your logo at the top or bottom of the image in the center. Make it noticeable but tasteful.
  • Provide context to show how to use your product or service – is it central to a time of year, time of day, a special occasion? 
  • Bold, clear use of a text overlay to convey your main message and help with SEO – provide some context. Make sure it’s legible on mobile!
  • Vertical format in a 2:3 or 1:2.1 ratio (600×900 – 600×1260 or 1000×1500)
  • Get our free templates which incorporate all these elements and more!

Check out this beauty by Smucker’s!

Irresistible Pinterest Pins Start with Striking Images

Whether it’s a product photo you’ve taken yourself, images from a custom lifestyle shoot, or the perfect stock image, the background image for your Pin sets the stage for success – literally. If you’re selling a product, you’ll want to feature it prominently, but probably won’t want to use all product images on a plain white background. Try putting them in a real-life setting, photograph it from different angles, or simply show someone enjoying it in their lives. 

If you’re selling a service, you’ll often have to be a bit less literal in your image choice. For instance, it may be tricky to try to visually represent something like tax services, or a blog post that will promote your services. However, in this example, the Creator thought about their audience (bloggers) and created something that would appeal to them and used a strong text overlay to convey their message!

The Best Pinterest Images Make an Impact with Emotional Connection

Pinners love the platform and often cite the fact that it’s an oasis from the negativity of social media as one of the top reasons it’s their “happy place.” It’s a place people go to look for inspiration and ideas. Make sure your images foster those feelings. 

This Pin has me ready to pack my bags!

Include Branding on Your Pinterest Images

While 98% of Pinterest searches are unbranded, Pinterest consistently reports that subtle branding increases overall Pin effectiveness. While no reason has been given to explain this effect, it could be that seeing that brand name prepares the person clicking on the Pin for the site they’re about to visit, builds trust and awareness, making them more likely to take action on the site.

Provide Context for Your Pinterest Images

Show people how to use your product or service. Show it in use in real life; and whenever possible, tie in a connection with an event, season, or an everyday moment – like dinnertime with family, homework with the kids, or starting your workday. 

Add Bold, Clear Text to Your Pinterest Images

Since most of your Pin description isn’t visible in the feed, let people know what your Pin is about with some helpful text on your image. Give them a reason to click.

Did you know that Pinterest reads the text on your images?!?! It’s true! So, make sure to incorporate keywords on your image. 

And while Pinterest can read your text, make sure humans can as well! Skip the curly, fancy fonts and stick with easy-to-read text while using plenty of contrast with the background. Remember, most people will see your Pin on mobile where script fonts can be hard to make out.

The Ideal Size For a Pinterest Image

Pinterest has provided clear guidelines:

  • 2:3 ratio is recommended. That could be 1000x1500px or any equivalent ratio
  • You can go up to a 1:2.1 ratio before your image may be cut off in the feed or not distributed. That works out to be 1000x2100px or equivalent.

It’s easy to see why you’d want an image that is portrait aligned rather than horizontal – they just look better and take up more room in the feed. The quest for more real estate in the feed has lead to some verrry tall, or “giraffe” Pins, however. Pinterest determined that those didn’t provide the best user experience, and so has either truncated most of those extra-tall images or prevented their distribution.

What If I Don’t Have Enough Content for Pinterest?

Make more. 🙂 Pinterest gets specific about what they’re looking for when it says,

“You should create new Pins linking to your claimed accounts at least once a week. Consistent, ongoing activity is the best way to build a dedicated audience on Pinterest.”

For those of us strapped for time, the good news is that “content” can just be a new Pin on Pinterest! 

Make More Pinterest Images for Each Blog Post and Product Page

Isn’t one enough? 

I know, I know. When you hit “publish” on a blog post, the last thing you want to do is spend MORE time thinking about it. But you know as well as I do that your content is only valuable if people see it! In fact, many professionals suggest you spend as much time or MORE promoting your content as you do creating it.  

Fortunately, creating multiple Pins for each post or product can be quick and easy, and there are compelling reasons to do so!

“When it comes to increasing content mileage, solving traffic problems, and keeping Pinterest happy, images offer the highest ROI when compared with other, more labor-intensive tasks.” Tina Gammon, Creative Director at Simple Pin Media shares her reasons

That’s right, the easiest way to multiply your Pinterest traffic is to multiply the number of new Pins for each page or post on your site or blog!

What Makes a “New” Pin on Pinterest? 

For a while, we were told that simply changing the description on a Pin would make a “new” Pin, possibly increasing your opportunities for exposure and distribution. Many people consider a “new” Pin to be anything other than a Repin. While it can all seem rather confusing, the actual answer is quite simple.

A new Pin is a new image/URL combination. So, you could make 10 images for one blog post or product listing and have 10 new Pins! Or, you could make 10 new blog posts with an image for each and have 10 new Pins. I think it’s pretty clear which is easier to do!

6X Pinterest Traffic with When You Make More Pin Images!

A new image for an older post can breathe new life into your content on Pinterest and bring in more traffic, too. It’s not simply the result of giving Pinterest what it wants (new Pins!) either. New designs can appeal to different people, giving your content a better chance at attracting the all-important click!

For example, Jessica Boschen of What I Have Learned took a post from way back in 2015 and created a new image for it. Her new Pin has generated over 10,000 visits to her site in the past 30 days, compared to a (still-impressive) 2,000 clicks!

Original:

New:

Tina and and Simple Pin Media team noticed something very similar in one of their client’s results. Here, the original Pin got 779 clicks, but when they save the new image, it received 5.5K clicks in the same time period. That’s an increase of over 600%!

Original:

New:

And remember, Jessica and Simple Pins’ client enjoyed meaningful traffic increases from creating just ONE Pin. You can create as many as you like!

[sc name=”CTA-image-Pinterest Toolkit”]

How to Choose Content for Creating New Pins

Naturally, you want the best return for your time spent, so you’ll want to choose carefully which content gets a fresh new Pin (or five). Here are three different methods to try:

Tina at Simple Pin Media says they use Google Analytics to look at winners and losers for traffic. If a post or page is doing really well, they capitalize on that trend with a new image. If the piece never really took off or the traffic is sliding, they’ll make a new image to try to revive it. Here’s an image they tested for a client. Can you guess which performed better?

(The one on the right!)

Jessica of What I Have Learned has a different approach. “I chose posts that were seasonally popular in the next month (back to school).  I knew these posts had gotten a lot of traffic in the past.“

Here at Tailwind, we’d be interested in creating new images for content that we know encourages people to sign up for a free trial. Whether that content is a week old or three years old, if it still works, we can give it new life and new traffic with a new Pin image!

How Many Pins Should I Make for Every New Post?

The answer is…as many as you reasonably can! But it also depends on the volume of content you have and your publishing schedule. For example, if you have 10 blog posts and you only publish one new post a month, creating 4-5 images for each post will keep you adding something brand new to Pinterest every single week. Consistent activity is a signal Pinterest watches for and rewards with greater distribution.

If you have 300 blog posts or product listings, you might just choose the ones that convert the best or the ones that are most relevant this time of year and create 1-2 new images for each. 

Tailwind Tip: Add the variations on your seasonal Pins to SmartLoop and they’ll get shared at the best times each year without you having to remember to do anything!

Going forward, if your publishing schedule is say, once a week, aim to make 2-3 images for each post and share them a week apart (remember to schedule with Tailwind!).

Jeff Sieh, of Manly Pinterest Tips says, “Since Pinterest mentioned that they want new content, we’ve initiated a “Fresh Pins Strategy” at KimGarst.com

For every blog post, we create at least 5 different variations on the image, as well as the Pin description, then use Tailwind to schedule out those Pins using interval Pinning.  At the same time, we pick which image we think will work the best and add that to our Tailwind Communities. All these Pins are tracked with UTM codes and the versions that perform the best are added to Tailwind’s SmartLoop to Pin evergreen content throughout the year.”

Very smart!

How to Make New Pins for Existing Content – Fast

Don’t feel like you need to start from scratch every time. Some savvy Pinterest marketers have image templates on hand that they can reuse for every single post. And you don’t always need to start from a completely different main image, either. You could:

  • Zoom in on your product or stock image
  • Rotate the background image
  • Change the text on the image to highlight a different benefit or feature
  • Change colors and filters
  • Change text fonts and sizes.

The idea here isn’t to “trick” Pinterest into thinking you have a new Pin so they’ll increase your content reach – it’s to present your content in a fresh, new way that inspires people to click. 

Pinterest does look for continuity between Pin image and the images on your page, so you might find you have better results if you stick with a similar style or color scheme, but test it out for yourself!

Jessica says, “So far, I have always used a new base-image, of some sort. I want the image to look entirely different.  In the future, I may consider using older photos as the base-image and reworking the elements around it.” For example:

As we discussed, a new description on an old image doesn’t make a Pin “new,” but some people like to try new descriptions when creating new images for content. While this doesn’t allow for a true “A/B” test, it could help you get found for different key words, or the call to action you use in the new description might prove to be more motivating than the last. 

Try Templates for Faster Pinterest Image Creation

Tina is a big fan of templates, saying, “We currently have ten templates in play for Simple Pin Media Content. These branded templates make it super easy to test both a new image and Pin copy (separately of course – one element at a time!) in a relatively small amount of time.”

Speaking of templates – we’ve created a bunch to give away as part of the Perfect Pinterest Pins Toolkit. In it you’ll get:

  • 16 Pinterest image templates in PhotoShop and Easil formats.
    • Available for four popular business niches – select yours or grab them all!
    • Designed for four different business objectives – awareness, email signups, online sales, offline sales.
    • Endlessly customizable with PhotoShop or Easil!
  • Perfect Pin description guide.
  • Irresistible Pin image checklist.
  • Exclusive Easil Discount.

Haven’t tried Easil? It’s a super-easy drag-and-drop editor we think you’ll love. Here’s how to remix an image using image editing software Easil.

In Conclusion: How to Make Irresistible Pinterest Images in Seconds

There IS, in fact, a magic formula to creating irresistible Pinterest images that drive traffic:

  • Start with striking visuals in a vertical format
  • Make sure you elicit an emotional response
  • Feature your branding
  • Provide context and play into seasonality or everyday events
  • Use a clear text overlay to provide context and help with SEO
  • Make use of templates to make more images in less time.

So, what do you say? Have a few seconds to make great Pins this week? Grab our Perfect Pin Toolkit! We’d love to see what you do with the templates – please share a link to your creations in the comments!

[sc name=”CTA – Image – Pinterest Toolkit”]

Pin it for later:

How to Create Pinterest Product Images that Drive Traffic and Sales

This is a guest post from Holly Cardew, founder of Pixc.

Increasingly, people make purchasing decisions based in large part on images they see online. So, if you’re looking to sell products on Pinterest, you’ll need beautiful product images. This is not news to you! The good news is that this does not need to be complicated or expensive.

And there is so much to gain. Shopping on Pinterest has never been easier;  in fact, 87% of Pinterest users have made a purchase because of the social media platform.

I know how powerful a picture can be; as an eCommerce expert, I help online retailers sell their products by creating optimized product images. And today, I’m going to show you how YOU can, too.

[sc name=”pinterest-ecommerce-webinar-text”]

How to Make Your Product Images Stand Out on Pinterest

Remember, every Pinner is a potential customer!

First, the basics:

  • Images should be high resolution and in-focus. Portrait-oriented images work best for Pinterest feeds, as they take up more real estate than a wide image. When it comes to attracting the widest-possible audience and to figuring out what will work for you, variety is key.

Why Product Image Variety is Key for Pinterest

Pinners use Pinterest for building personalized wardrobes, planning the layout of their new house, organizing their wedding, planning a party, and so many other reasons.  Your job is to create images that they WANT to Pin to their Boards, and in doing so, share with their followers.

Generally, Pinners, like to mix it up to include product images, contextual shots of the product, and also general lifestyle photos. Check out this “Kids” board:

Types of Product Images for Pinterest That Drive Traffic

Because Pinners use Pinterest for inspiration and planning, you’ll reach more potential customers when you branch out and try different types of product images. For example:

[sc name=”create-cta-white-ecommerce”]

Product Images with a White Background

Often,  products really stand out on a white background. The image is free from distractions and lets users (or potential customers) visualize a product. (Don’t know how to take these well? We’ve got you covered!)

In addition, clear product shots are useful for greater exposure via Lens –  Pinterest’s visual search.

Lifestyle images for Pinterest

In-context shots or lifestyle photographs gives a customer a feel for the product. It helps them decide where and how to use or wear the product.

It also allows you to show off your brand vision and creativity – and often generates more engagement than a straight product shot! Jumbled uses a creative approach – half way between lifestyle and product shot:

Whenever possible, lean into a seasonal aspect of your Pin – Pinterest found that results in a 22% sales lift.

Close-up images for Pinterest

People Pin images for different purposes. The pattern on a summer blouse could inspire home decoration or a party theme, not just an outfit. This image gives you yet another way to attract visitors to your site – remember, every Pin saved provides another opportunity for someone to discover your website.

This “Pineapples, Please” board is an example of how a Pinner has pinned all different types of images. She includes product images (shoes, a tote bag, and an ice mould), along with table setting images, quotes and general pineapple photos. Even if she’s Pinned your pineapple wallpaper just because she likes the design, one of her followers may spot it as the perfect choice for their bathroom makeover!

Photographing your products from a  variety of angles and from different distances will also help increase your exposure in Pinterest’s visual search. It allows users to search for images, instead of entering in keywords.

Pins with Multiple Products in the Image

Pinterest suggests Pins with multiple products in the image can drive more clicks than single-image Pins.  For example, show all the colors or patterns your items comes in. But don’t let it get too busy – fewer than five products per Pin works best.

Product Images for Pinterest: What’s the Best Size?

Pinterest recommends a 2:3 ratio (600x900px, for instance) for Pins. Although this size might be optimal, it is important to test what works best for your brand and audience. Louise Myers explains that infographics and longer Pins perform better for her. Pinterest has also said that longer images may be truncated in the feed or not distributed in certain feeds, so try it, but make sure to check your Pin performance.

How to Create Pinterest Product Images that Drive Traffic and Sales

A Detailed Pin Description Can Drive a Sale

Your Pin description is so, so important. Not only is it useful for telling Pinterest what your product is (and thus helping it be surfaced in appropriate searches), they can be a powerful tool in motivating Pinners to visit your site and purchase!

Descriptions should be clear, concise and easy to read. It should tell the customer what they are looking at, how they can use it, and anything else relevant to making  decision to purchase.

Include the name of the product, the collection and the brand. Pins with a brand name in the first sentence of the description drove 54% more email signups – and email is a great way to turn a browser into a buyer!

Then, explain to the customer how they might use the product. Would it look good on the beach? Does the summer dress go perfectly with a white open-toe sandal?

Is there a seasonal or event-based aspect to the product (or MIGHT there be?)? If so, create some Pins with those keywords in the description, too.

Using Hashtags on Pinterest

Hashtags are a relatively new feature on Pinterest – and their popularity is growing. You can use up to 20 per description, but Pinterest now suggests 3-5 maximum. No one wants to be bombarded with hashtags!

Relevant hashtags could include the type of product, the brand, and season. Remember to use popular search terms to increase your search result ranking and discoverability. Go for more complex hashtags rather than simply using #fashion or #fall, which may be too vague for you to stand out.

In Conclusion

Following these simple steps will help you take your product images for Pinterest to the next level, get repinned, and drive traffic to your eCommerce store!

Do you have any other best practices for Pinterest? Let us know in the comments section!

[sc name=”pinterest boilerplate”]

  Pin me:

Flat Lay Images for Pinterest: 7 Tips E-Commerce Sellers Must Know

Flat Lay with the text: 7 Pinterest Flay Lay Tips for E-Commerce Sellers

This is a guest post from Kayla Marie Butler of Ivorymix.com.

E-commerce businesses can sink or swim based on product photography. And while lifestyle photos tend to dominate e-commerce photography on Pinterest, gorgeous flat lay product Pins can appeal to users in a different way that works well with the “inspire, plan, and shop” mindset of a Pinterest user.

When it comes to making a purchasing decision, 93% of consumers say photos of products are absolutely essential. Every photo you take and share online represents your product’s perceived value and quality.

What flat lay photos can offer your products is a way to show off the closer details of and quality. In a split second, product photos convey values such as brand, way of life, and state of mind — however they can also impart subtle, but important, elements for your products, for example, item material details and quality.

As a photographer, and e-commerce website owner myself, I can attest to the fact that the success of your online store depends in large part to having great-looking photos which make your products irresistible. The quality of these photos can have a big impact on traffic from Pinterest, and more importantly, on how much you sell!

Whether you’re looking for new ideas to approach your product styling, or gathering some techniques to try on your next photo shoot, these concepts for flat lay photography will help you create stunning flat lay photos, enabling you to showcase your products beautifully on Pinterest and elsewhere.

[sc name=”pinterest-seo-webinar-text-cta”]

Photographing Flat Lay Backgrounds

As you begin to plan promoting a new product on Pinterest and prepare for your photoshoot, it’s best to start with the background.

You can utilize any surface you like – a table, a cloth, a chair, a foam board, paper or almost anythin else. In most cases, it’s best to stick with simple backgrounds as it helps products take center focus, particularly if the products are small. Avoid using anything with a pattern or heavy texture; it will distract from your product. And since most Pinterest users are on mobile, clarity and sufficient whitespace is an absolute must.

In some cases, the background can become part of the overall composition that can help accentuate an element of the story of your product that you want to convey. An example of how the background can enhance an element of the story is shown in the below images where I’ve used a marble top, which might be on the consumer’s vanity where they would use this makeup. Just don’t go overboard with background details or your photo can seem too fussy – and it will be hard to decipher on Pinterest!

Color Palettes for Great Flat Lays

When an artist chooses colors of paint for their paintings, they take many things into consideration. Since colors define mood, if their painting is to convey a happy mood, they’ll likely choose more bright and saturated colors. Although it may seem like there are many colors in some paintings, these are often thought out and well-planned color schemes.

As a photographer, be deliberate with the colors you use before you begin. Much like an artist would choose a scheme, you will need to pick a color scheme and plan for your photographs according to the mood, story, brand and products. Take some time before you pull out your camera to pick distinctive tints, hues, and shades that go well with your product. These can be shades of only one color, black and white, or your own delightful blend of on brand colors.

[sc name=”create-cta-white-ecommerce”]

When choosing colors for your photos, consider what emotions you want to evoke with your product photos. If you are going for comfortable and cozy, you might choose dull blues and perhaps delicate blush pinks.

Then again, fresh greens and white are a good choice if you are going for an inspiring and airy feeling. You can read more about the meaning of different colors in this blog post from Canva.

Props for Flat Lay Pin Photos

Think about the items you’ll use to tell a story about your product. In some instances, this may come down to the color of the objects; but in almost all cases, the objects and props should be related to the subject matter. For instance, if you sell recipe books, you might include ingredients, utensils, and linens as props for your photos. If your product is high-end and comes with a higher price tag, you’ll most likely want to match that quality in the props you choose.

When I make decisions about what props to use for the photos I create or the product photos I take for clients, I ask myself this simple question. “Would the ideal customer also own this and have it by their side when using the product I am photographing?”

Lighting Your Flat Lay Pin Photography

With all photography, good lighting is essential. Though I prefer natural light, I generally utilize studio lighting for consistency. Keep in mind that being closer to the light source (like a window) will mean a more brilliant and brightly-lit photo. Getting further away from the light source will mean a photo that may appear a bit more moody and dim.

For a flat lay photo, it’s best to think about where your shadows will land when photographed. I’ve found that it’s better and more pleasing to the eye for the shadows to land left or right of the objects as opposed to the shadows landing above the object. In these examples below, see how shadows can be either a large or small component of your photo – depending on the effect you desire.

Adjust to create long shadows or short shadows by varying the height of the light source relative to the surface you are shooting. Generally, and you’ll find it feels better and more natural when the light is diffused.

In very few cases you may prefer to use direct lighting (direct sunlight or an exposed light bulb). It’s all about the way it looks and the feelings it evokes.

Effective Flat Lay Composition

First, consider how you will use the photo in your marketing. If you know you will only use your photography on Pinterest, then you can go ahead and choose a vertical format. But if you’ll also use it on Instagram, Facebook and other places, make sure you layout will work for square and wide images as well.

Knowing if you need to add text to your product photos or where your product photos will be used can help you make better decisions about how you frame the photo, which will make your life much easier from the start. Effective Pins often do utilize text on the image, so make sure you leave room for that.

The rule of thirds is a simple technique that can increase the visual interest of your photo. Simply visualize a concept that uses a grid of 3 x 3 squares and suggests that you can create more visual interest by place keying objects on the intersecting points.

Most cameras and phone cameras can display a grid when taking your photos. This option is usually located under the camera’s settings menu. The grid comes in handy when using the rule of thirds to help with your composition.

The fun in photography is hardly found in following rules though, which is why some photos require what I like to call “freestyling”. Freestyle photography is often referred to as “lifestyle” photography where objects are more scattered in an image to help your products appear usable as they are viewed in a more natural environment than in a clearly structured and styled scene.

Freestyling is about finding a balance and flow between your props and products. When styling, think about the placement of the larger items. When you make an effort to scatter larger objects through the frame, it can appear more pleasing to the eye and draws you in to take a closer look. It encourages viewers to absorb the details and while smaller items sit between the larger ones to create balance it helps our eyes bounce from one larger object to the next.

Another thing to consider in your composition is the texture of the items you choose to photograph to create interest. You can do this by mixing object textures – consider using some hard (ceramics, metals, glass etc) and some soft (linens or flowers).

Choosing the Focus of Your Product Flat Lay

In most cases, your product will be the main focal point of your photography. Meaning they will be larger in the frame. The largest object or product in a flat lay is often referred to as the hero of the image. Since the hero should to take center stage, it’s your job as the photographer to only place supporting props and elements in your scenes that don’t distract from the product.

The rule of thirds can help you think about where you place the main focus of your image and help you decide whether it should be in the center or on one of the intersecting cross hairs in your 3×3 grid of square. When aiming to place your main focal point in the center of the grid, it’s best to ensure the center is perfectly center and not “close enough.” If you find that you’ve taken your photo with the object slightly off center, remember that you can crop and finetune your framing when you edit your photos.

Storytelling with Flat Lay Images – Perfect for Pinterest!

Your product has a story and like all good stories, the photo you create will have heros and supporting characters. But, it can be a challenge to choose props which contribute to your story, rather than detracting from the attention due your hero.

If your product is, say, a course or ebook on creating floral arrangements, it might seem like taking photos of finished arrangements is enough. However, if you consider the objects used to create a floral arrangement, you might start thinking about scissors, string, a vase, and maybe a jug of water. Suddenly, as we start to add these supporting characters, a story of your product and hero begins to take shape.

Beyond that, Pinners love a good story. To motivate them to buy, they need to picture themselves in the story, and showing the product in its natural habitat is the best way to do that! One visually inspiring way to tell a story about a product on Pinterest is to show a stack of photos that demonstrates the product in use. Just make sure to stay within Pinterest’s ideal image ratio of 2:3.

The story you choose to tell could be one about how the product is made or how it’s used on a daily basis. In some cases it can also be as simple as a color story where every object in the photo shares a similar hue.

In Conclusion

Photos can make or break a sale in just a few short seconds – and long before anyone even clicks on your Pin. Using stunning flat lay images on Pinterest is one of the best ways to clearly highlight the details and quality of your product before shoppers get to your e-commerce website.

You’ve now got some great ideas to approach the planning of your product styling on your next photoshoot. Armed with these seven handy styling tips, you are ready take a spin at styling your own flat lay product photos to help you achieve better traffic and sales on Pinterest! 

[sc name=”pinterest boilerplate”]

 Pin me:

Flat Lay with the text: 7 Pinterest Flay Lay Tips for E-Commerce Sellers