The Ultimate Guide To Creating Facebook Live Videos

A screengrab of a Facebook Live from Tailwind on a coral background

Facebook Live has gained a lot of popularity and dedicated audience in recent years. 

25% of users watch live videos to stay informed or up-to-date, according to 99firms. Meanwhile, the number of Facebook live broadcasts reached 3.5 billion in 2018. 

These numbers show that Facebook Live is a promising platform. Now, how can you jump on the bandwagon? In this article, we’ll share the tips and tricks to creating Facebook Live videos! 

What is Facebook Live?

Facebook Live lets users live stream events, gatherings, and performances on the social media platform.

As long as viewers have a Facebook account, they can watch live content through their PC, smartphone, or connected TV. 

Since it’s recorded in real-time, brands can connect with users in a personal and fun way.

They can also communicate and engage with streamers through reactions, comments, or shares. 

A Live video broadcast announcement from ONE Esports

How To Find Live Videos On Facebook

Step One: Visit your newsfeed and click the “Watch” option on the left sidebar. 

A view of the facebook dashboard with the Watch button highlighted on the left menu

Step Two: Select “Live” below the Watch category. 

A view of the Watch menu, with the Live button highlighted

You’ll then find Live videos relevant to your interests!

When you watch a Facebook Live video, you can make a comment, reach or share it on your Facebook profile.

Some streamers will respond to comments during the live session to communicate with viewers directly.

How To Go Live On Facebook

Going live on Facebook is a fairly simple process. 

In your Facebook newsfeed, hover to the “What’s on your mind?” and click Live Video. 

Shortly after, you’ll be redirected to a dashboard where you can choose how to set up your Facebook Live video. You can also modify your Stream or Viewing options in the Settings section!

In the left sidebar, you’ll have the option to “Go Live Now”, “Schedule a  Live Video Event”, or view “Upcoming Live Videos  & Events”. 

A view of the Facebook Live Producer dashboard with relevant settings and options.

In the Post section, you can add a title or caption for the video. 

Adding a Title and caption to a post about your live stream on Facebook in Live Producer

Once you’re ready to stream, click the “Go Live” button at the bottom left. 

Tips For Creating Facebook Live Videos

Wondering how to create Facebook Live videos that people want to watch? Here are some tips to help you out. 

1. Create Goals for Your Live Broadcast

Similar to all your marketing content, creating Live videos on Facebook begins with setting goals and making a plan. 

Do you want to grow your following or boost conversions? Do you want to attract new leads? Think about the purpose of your live broadcast and the most ideal video format for delivering your message. 

Here are some popular live video formats to consider:

  • Q&A sessions
  • Product or service reveals
  • Interviews
  • How-to videos
  • Behind-the-scenes footage 

The purpose of your live broadcast will determine the live video format. Let’s say, you want to promote awareness for an upcoming new product.

A live stream in a product reveal format could generate hype and boost awareness. 

2. Promote Live Session in Advance

People won’t tune into your live broadcast if they don’t know it exists. 

That’s precisely why you should promote your live sessions a few weeks in advance.

Create social media posts featuring the date, time, and topic of the event. Mention it in your promotional emails to subtly remind customers to tune in. 

For example, meteorologist Frank Waugh created a video to announce his upcoming live videos. 

Here are some ways you can promote your Facebook Live videos:

  • Create social media posts
  • Send emails to announce Facebook Live sessions
  • Create short clips promoting your live sessions in FB or IG stories
  • Create videos or blog posts related to the live video session’s main topic
  • Send sign-up forms so interested viewers will receive notifications and tune in to the broadcast

3. Record Test Videos 

Gifted streamers can seamlessly stream a live session and connect with audiences in an instant, but not everyone is gifted with such charisma. 

To make sure everything goes smoothly, record a test video. Look for a quiet area with ample lighting. Rehearse what you’ll tell viewers during the live session. The more you practice, the better results you can expect. 

Evaluate the output of your test video. Is the sound quality and lighting quality okay? Were you able to communicate your intended message with clarity or should you modify the script? How will your audience feel when watching your live sessions?

4. Offer Context

Dedicated fans know relevant details about your products and services, but first-time viewers may also be tuning in. 

Remember to offer context by starting off with an intro about yourself and your brand’s offerings. For example, you could say something like, “Hi I’m Leslei, and I’m the host for this live stream by Brand XYZ. Every Wednesday, we regularly discuss Mediterranean recipes”.

When you’re inviting a regular guest to join the discussion, introduce them first because first-time viewers won’t know who they are. You can also pin a comment or add on-screen text to provide clarification and context. 

4. Engage with Viewers

Once you have everything in place, you’re all set to go live. 

If you’ll have a long live stream, create an outline featuring the topics that you will discuss. This way, you’re guaranteed to cover all the bases and avoid missing any relevant information. 

A good tip is to encourage viewers to ask questions about your product or service to clear up their doubts. Alternatively, you could also ask questions, make polls or host a contest to stimulate participation. 

5. Monitor Comments 

It’s challenging to host and monitor discussions in the comments simultaneously. Hence, get a friend or colleague to monitor the comments section. 

Their role is to find comments or questions that have racked up a lot of likes or reactions during the live stream. This way, you’ll be able to address popular inquiries before you wrap up. They can also reply to comments in real-time to satisfy your viewers. 

6. End with an Actionable Sign-Off

What do you want viewers to do after the live session ends? Don’t just click the “Finish” button once you’re done. Instead, finish with a clear call to action that reinforces the original purpose of the live stream. 

Do you want people to buy your products? Tell them to click the link to the product page featured in the caption. Do you want them to share it with their friends and family? Tell them to tag people in the comments section. No matter their purpose remember to wrap up with an actionable message. 

For example, Refinery’s 29 invited broadway dancer Leslie Flesner for their live video featuring stretch and mobility routines. In the end, they signed off by sharing details about Leslie’s website and social media pages so viewers can tune in to more classes. 

An example of a Facebook Live where the CTA was to follow the host on social and visit her website.
Refinery29 Facebook Live

6. Summarize the Session 

Interested viewers may not be able to watch from start to finish, and that’s perfectly fine. 

The good news is that the live session will be published on your profile or Page after the broadcast. As a result, followers can check out what they missed or view the content once it’s available. 

Viewers may not be able to watch the entire clip, especially if it aired for several minutes or more than an hour. That’s precisely why you should create a summary with all the important details or announcements discussed in the live session. Consider including timestamps so people can quickly watch the segment that is relevant for them. 

For instance, Secret Tarot’s video includes timestamps so viewers can check out the tarot readings they prefer. 

An example of a Facebook Live with time stamps for relevant audiences.
Secret Tarots Facebook Live

7. View metrics 

Similar to your marketing campaigns, you’ll need to view results and analyze metrics to identify points of improvement. 

At the Page Insights or the Video Library section, Page owners can click the live video to access its metrics. 

Note: Video Insights are now moving to Facebook Creator Studio, so expect to be redirected when you access video insights through Page Insights!

At the Page Insights or the Video Library section, Page owners can click the live video to access its metrics. 

This includes the number of viewers a broadcast can get at its peak, how long viewers stay for the live broadcast when they’re leaving the broadcast among many others. 

Here are the metrics to keep in mind:

  • Peak Concurrent Viewers: The highest number of viewers who tuned in during the broadcast.
  • Viewers During Live Broadcast: Provides a visual representation of the number of viewers present in every moment of the broadcast. 
  • Unique Viewers: the number of people that watched your live video. 
  • 10-second views: the number of people that watched your videos for 10 seconds. 

How to Create Facebook Live Videos – In Conclusion:

Facebook Live videos provide an exciting avenue to connect with your audience. 

Filming successful Facebook Live Videos involves setting goals for your live broadcast and recording test videos in advance. Boost viewership by building hype through social media, email, or content marketing campaigns. Don’t forget to create a summary and post the finished live session on your page so people can tune in. 

Got any questions about creating Facebook Live videos? Let us know in the comments! 

[sc name=”pin-me-tailwind-create-cta”]

Wondering how to create Facebook Live videos? In this article, we’ll share the tips and tricks for broadcasting live content.

7 Instagram Marketing “No-Nos” (Backed by Science!)

a sponsored instagram ad from Brookhaven Boutique featuring a woman in a blue leather jacket and blue pants on a blue background.

Whether you’re trying to grow your own influencer account on Instagram or using it as a marketing tool to drive sales, Instagram is one of the most powerful social media tools at your disposal.

That may be because, according to Instagram, 90% of users on the platform follow at least one brand or business. Not only that, but one study estimates over 35% of decision-makers use Instagram to inform their B2B purchasing decisions too—even more than Linkedin.

That makes a powerful argument for selling on Instagram! But if you don’t know what you’re doing, Instagram marketing can also be frustrating, discouraging, and overwhelming.

Many social media marketers spend hours each week planning a perfect Instagram, only to see discouragingly small growth and engagement numbers.

To remedy this all-too-common issue marketers face, we’ll use well-known psychological studies and more recent Instagram marketing science to reveal 7 “No-No”s when it comes to your Instagram marketing.

If you’re routinely committing any of the Instagram “sins” we mention below, dive deeper into your own engagement and follower data and consider dropping these bad habits.

No-No #1: You’re a Little Too Polished

The reason people love Instagram is because it provides a visual window into the life of a person or brand they’re interested in.

And while it’s pretty clear that no one is 100% honest or transparent on social media all the time, studies show that keeping things genuine will boost consumer trust and even sales or engagement.

Cialdini’s principle of social proof reminds us that we are more inclined to take an action if people who seem similar to us have taken that same action.

One study found users were more likely to follow an Instagram account that posted images of featured customers to their account.

What does this mean for your Instagram account? Here are a few things to consider:

  • Avoid highly photoshopped images, opting instead for real-life images of people
  • Avoid too many images with text or graphic design elements; users come to Instagram for images
  • Include images of people who resemble your target audience. The more your followers “see themselves” using your product, the better.

No-No #2: You’re Unpredictable & Infrequent

Few companies have the luxury of hiring a full-time Instagram marketer. And few influencers have the luxury of working on their account full-time!

All of this leads to one simple truth: none of us have as much time to post on Instagram as we want to.

Unfortunately, for many of us, this can lead to unpredictable posting schedules and large gaps in our posting calendar.

But beware: science shows that the most successful Instagram accounts post frequently and consistently.

In our own study of over 100,000 Instagram users, we found the more often you post on Instagram, the more likes and followers you gain.

Our findings suggest that accounts who post at least once per day, seven days per week, grow their following significantly faster than accounts who post less than seven times in a week.

Frequency leads to high engagement, which the Instagram algorithm loves, rewarding your account with even more engagement and followers.

Consider scheduling out your Instagram posts in order to get ahead of your own schedule and keep up the consistency!

And if you can’t quite manage to post on a daily basis yet, don’t worry: there’s also a strong positive correlation between consistent posting and account growth.

One study found that accounts who were more consistent and predictable in their posting saw an increase in followers and engagement.

And Tailwind can help! Create unique Instagram posts, visually plan a scroll-stopping feed, and set a schedule to keep you rhythmic and consistent while posting at peak times of engagement!

No-No #3: You’ve Got a Static Bio

When one of your hard-earned followers actually wants to learn more about you or even purchase something you have for sale, can they do it easily?

The default behavior for Instagrammers is to put a “link in bio” (a long-used work-around for Instagrams “no links in captions” rule).

But many big accounts don’t utilize their Instagram bio to convert followers into customers!

And while research shows no correlation between your bio’s length and the number of followers you have, if your bio never changes and your bio link is never updated you’re missing out on some big opportunities. 

We recommend implementing Smart.bio to house one link that auto-updates with all your content as it goes live!

No-No #4: You’re Not Leveraging Instagram Stories

You may not include Instagram Stories in your Instagram marketing strategy. According to the most recent data, that’s a big mistake.

According to a Facebook-commissions survey, 58% of users who watch stories at least once per week say they have become more interested in a company or product after seeing something about it in Stories. 

Not only that, but the same report claims 50% of people surveyed admitted to having made a website purchase after seeing a product or service in Stories.

Instagram Stories are a huge opportunity for social marketers. Instead of turning a blind eye to this growing trend, we suggest you dive in with both feet.

If you’re short on time, consider using an Instagram Stories background template in Tailwind Create to get started. You can then seamlessly schedule your Story creation and post with a push notification!

[sc name=”mnc-create-visual-cta-abbreviated”]

No-No #5: You’re Asking Too Much; and Giving too Little

Years ago, a university professor was featured on NPR for his experimentation with the Rule of Reciprocity.

In essence, here’s what happened:

The professor sent out 600 holiday cards to complete strangers at Christmastime. As a result, he got 200 holiday cards back from these same strangers. That’s a 33% reciprocity rate.

So what does this humorous study mean for your Instagram account?

If you’re asking for a sale, a like, or a follow too often without giving back to your community, then you’re working too hard in the wrong direction.

Social Media expert Gary Vaynerchuk calls this “jabbing” more than taking a “right hook.”

Instead, try this: for 2 weeks, just follow people in your target audience, comment on their photos, complement their posts, and give away free stuff if you can afford it in an Instagram giveaway (free digital products with no strings attached or free swag like stickers or t-shirts).

Then sit back and watch the law of reciprocity go to work for you. You’ll be amazed at the goodwill, followers, and engagement you’ll generate.

No-No #6: You’re making too many cold pitches

Along the same lines as sin #5, if you’re asking for the sale too many times on your Instagram account, you’ll find yourself with a decline in followers and low engagement. 

To reduce follower loss and increase sales,  it’s important that you’ve appropriately prepared your audience long before you ask them to get out their credit cards.

In other words, you’ve got to warm up your leads. This all starts by getting your “foot in the door.”

One study on the foot-in-the-door strategy performed in the 60s aimed to see how many homemakers would allow a visitor to enter their home and observe their cleaning habits (a rather large commitment). 

Three days prior to their request, researchers telephoned 50% of participants to ask a few questions about their cleaning supplies.The women who responded positively to the initial telephone call (foot in the door) were 2x more likely to respond positively to the second request.What does this mean for your Instagram account?

Start with small requests (share a post with a friend, tag a friend in the comments) and work your way up to larger requests (purchase my product, sign up for my service, schedule an appointment).

The idea is to leverage the “foot in the door” strategy to your advantage to generate more eventual sales by building trust.

No-No #7: You’re Not Repeating Yourself Enough

You might think it’s annoying to your followers for you to post about the same things over and over again.Research shows just the opposite.

One researcher showed this by displaying a series of foreign characters to a group of participants and asked them to assign meaning to each symbol. Over time, the participants began to assign more favorable meanings to the symbols they saw more often. 

Another pair of scientists displayed just how strong repetition can be when they showed their participants an octagon for only milliseconds among other shapes.

After a short time, they found that participants “developed strong preferences for objects that have become familiar through repeated exposures” even if those objects were not immediately recognizable.

In layman terms: people begin to like things they’ve seen a lot.

Even if they’re just momentarily scrolling past you in their Instagram feed, that repetition can be the difference between your audience recalling you or your competition when the time comes for a purchase.

Putting all this “science” to good use

To wrap this up, allow us to offer some advice about following science and social media marketing tips.

Things change fast. Every account is different. Every audience is different.

And while many of these tactics will work well for most people, there may be some here that are a total flop for you. That’s okay!

The idea is to test as many things as possible, find out what works for you, continue to iterate, learn, and grow. 

That’s the fun of social media marketing. And if we here at Tailwind can help along the way, that’s what we’re here for. Go get ‘em!

[sc name=”pin-me-tailwind-create-cta”]

Instagram marketing doesn't have to be rocket science - especially with these study-backed strategies to help you grow your account!

How to Add Music to Instagram Stories

A view of music list choices inside the Instagram Stories music sticker on a purple background.

Who remembers the nostalgic days on MySpace when you’d Google HTML codes to add features like hearts, custom background colors, and free-falling bananas on your page? (Okay, maybe the bananas belonged to my skateboarding middle school crush!)

Most importantly, you’d also pick out the song that would play whenever someone clicked on your profile. And it would show just how trendy and/or angsty your teenage self was feeling at the time. And ooooh, would it set the mood of your page!

Music streaming evokes memories, feelings, and ideas in your audience. It also shows creativity in a way that incites emotion! And sweet cheese and crackers, now you can add music on your Instagram Story, effectively taking your audience’s experience with your content to the next level.

And the best part is you’re not limited to one dramatic My Chemical Romance song, like in the days of MySpace! You can share many different songs depending on the mood you’re going for.

Okay, enough about Myspace. Suppose you’ve been wondering how to share music on your Instagram Stories, whether through the music sticker or another app like Spotify and SoundCloud.

Or maybe you’ve had troubles with the music feature and can’t get it to work. Well, why don’t you come with me to learn how to do all these things (on a magic carpet ride… )

And as always, there will be screenshots to show you this whole new world.

How to Customize and Add Music in an Instagram Story

There are a few different ways you can share your favorite songs through Instagram Stories music. The first and most common is uploading a Story background and adding an Instagram Stories sticker.

So, let’s break down how to add music to an Instagram Story through the music sticker.

1. Open your Instagram Stories camera, and upload a video or photo from your camera roll. 

2. Swipe up and click the MUSIC sticker.

This will give you access to thousands of songs through Instagram’s music library to choose from*, whether it’s on the “For You” tab, browsing by category, or searching for a song title in the search bar!

*Because of copyright laws, having a Business account limits your music options, which we’ll get into later.

3. Once you’ve selected a song, you can choose which portion of the song you’d like to be played to make sure you have just the right beat drop.

You can even tweak how long you’d like the clip to be, ranging from 1-15 seconds.

To make your music choice even more expressive and unique to your account, you can also choose different fonts and colors for the lyrics to display!  

a view of different text options for Instagram music sticker lyrics

Or, you can forgo the typography and stick to one of the two music sticker options that’ll have the song’s name, artist, and album cover.

These options allow you to add music in a way that sticks to your account’s aesthetic and your personal branding, which is pretty darn neat!

Now, let’s say you have a killer song that isn’t offered in Instagram’s music library, but you want to share it with the world?

That may be quite the pickle, but have no fear; we’ll tackle that together in the next section!


Did you know that you can plan, schedule, and post Instagram Stories with Tailwind’s Smart Marketing Assistant? Browse hundreds of Instagram Story background templates personalized to your brand in Tailwind Create, pick your favorites, and schedule them for the times when your Instagram followers are more active.

With handy push notifications, you can decorate your Instagram Story with all the stickers your heart desires, including the Instagram Music Sticker before sending your Story live! Try it out now and be prepared for amazement!


How to Add Music to Instagram Stories Without the Sticker

You can also add music to your Instagram Stories through the SoundCloud and Spotify app! While these options won’t directly play the music in your Stories, you can still share the song and album cover, and if someone clicks on the link, they’ll be taken to the respective app to listen. 

Easy peasy, right? Right. *Cue finger guns*

Related Reading: 5 Ways to Spark Endless Engagement with Instagram Stories

Adding a Song From Spotify or SoundCloud to Instagram Stories

Now, let’s go over how to add a link to your Instagram Story where music is concerned. Both Spotify and SoundCloud have the same steps for sharing a song to Instagram Stories. I’ll show you how to do it with screenshots in Spotify!

Step One: Open the Spotify or SoundCloud app. 

Step Two: Find the song title. You know, the one your heart wants to share with the world.

Step Three: Tap the ellipses icon at the top right corner.

Step Four: Scroll down and click Share.

Step Five: Press the Instagram icon, then, post it. And, voila, it’s ready to be shared in your Stories.

Just like that, your audience will be on the magic carpet ride to your intended mood. 

But, what if you’re still not able to share music in your Instagram Stories?

Don’t worry, friend, take my hand, and we’ll troubleshoot common issues Instagram users experience with the music sticker below!

Sharing Music to Instagram from Spotify

Why You Can’t Add Music to Your Instagram Story

Let’s say you followed all the steps, and you either don’t have the music sticker, or you can’t find specific songs you may have already seen in other stories. What then?

The most common reason the music sticker may not work is that this feature is only offered in the following select countries: Australia, Canada, Germany, France, New Zealand, Sweden, the UK, and the US.

If you live in one of those countries and it’s still not working, here are a couple more tips…

Update your app to the latest version. Not keeping your app up-to-date can cause glitches and things not to work correctly.

If most songs you want to share aren’t available, then it may be because you have an Instagram business account

Here’s what Instagram has to say about it:

“Based on these agreements, which are designed to protect artists, songwriters, and their works, many accounts have access to our licensed music library, but certain business accounts do not.”

Instagram

Because of copyright laws and agreements, only royalty-free songs are available to most business accounts. Meaning, many popular and trendy songs won’t be offered unless you have an Instagram Creator account or a personal account.

However, all business accounts still have access to the Facebook Sound Collection of 9,000 royalty-free songs and sounds!

If you’re in one of the countries where this feature is offered, you have a creator account, and it’s still not working, then you can email Instagram’s Help Center at: [email protected]

Inspiring Creativity with Instagram Stories Music

Music is a gateway to the soul. It can broadcast your authentic personality and what you’re trying to say creatively. It can also give your audience a sneak peek into who you are and what you like.

Music also enhances emotions and moods, giving your Instagram Story added depth and meaning. 

So basically, it can give you an entirely new and memorable way to connect with your followers and enhance your engagement! 

Whether it’s showing them a portion of your new favorite song, or bonding over nostalgic lyrics, music gives you another window to connect with and make an imprint on your audience.

Plus, if you tag the band/artist, there’s always a chance for a re-share!

So, how do you share music in Instagram Stories? Let me know below!

Until next time, cool cats.

[sc name=”pin-me-tailwind-create-cta”]

 A step-by-step guide on how to add music to Instagram stories with and without the app sticker. Along with troubleshooting for most common user issues.

How to Use Memes the Right Way On Social Media

Create and Cultivate Instagram Meme on orange background

As a social media manager, it’s tempting to jump on the bandwagon when you see a trend taking off. After all, getting a good joke or reference in early can dramatically boost your reach and let your brand ride the coattails of a trending meme. 

But more often than not, corporate SMMs find that they’re behind the 8-ball when they use memes on their accounts.

Nobody wants to come off as tone-deaf online, so it’s important to decide if memes are an appropriate addition to your social media strategy. Thoughtful design, a commitment to branding, good timing, and a great sense of humor all play a role in increasing your opportunity to go viral. 

Here’s what you need to know to use memes the right way in your marketing.

How Memes Can Help Improve Reach and Gain Followers

Memes are bite-sized, culturally relevant content that can engage a whole new audience in your brand. That is… as long as they’re done right. 

Meme culture is pervasive on social media, and it makes sense that brands would want a cut of that engagement.

Relevant and timely memes have a strong potential to go viral, which could quickly make your brand a household name.

However, most brands won’t keep the new followers a well-timed meme earns them unless humor is a fundamental part of the brand’s voice. 

One of the reasons memes are such a unique type of content is because they work on multiple platforms.

Once a meme goes viral, it can extend far beyond Instagram or Pinterest!

Creating a viral meme template can even lead to press features and links back to your social media accounts.

As tempting as those new followers are, it takes intention to start using and disseminating memes well. 

Brands that use memes well have an impeccable understanding of their audience: what they find relatable, what they see as funny or self-deprecating, and how familiar they are with existing meme culture.

These brands also know that this isn’t the time for heavy-handed marketing messages.

When a meme hits the mark, it’s a refreshing step away from overt marketing. It gives followers a feeling that you genuinely understand them and see their perspective.

We know that connecting with your audience is one of the best ways to grow your business and social following, and publishing memes can help you foster the connection you’re aiming for. 

Designing a Strategy Around Unpredictable Trends

There are three central ways to design new meme content: create a new meme, jump on the latest meme trend, or use familiar meme templates.

Many brands approach memes by aiming to jump on a trend when they see it. In these cases, social media teams need to be engaged in close social listening to hear the rumblings of a relevant meme that may be on the outskirts of their current audience. 

For example, following trendy creators outside your audience on TikTok and Reddit can help you find new trends or memes to explore on Instagram and Pinterest. You can also follow dedicated meme pages on Facebook to get a better feel for meme subtext.

Some audiences respond well to using tried-and-true meme templates. But, having a relevant, funny, and on-brand message is key here. Consider that your audience has seen this meme in hundreds of variations, so what makes yours stand out?

If you have the resources, creating a new meme template can be particularly successful. Still, it’s important to keep in mind that meme success isn’t guaranteed, so you may not see the ROI of creating a new meme. Creativity is the key when it comes to memes, so no need to map out a custom meme template with your whole team; instead, wait for inspiration to strike or have regular brainstorming meetings to find your brand’s unique sense of humor. 

As with any trend-based strategy, keep in mind that memes are a social risk. While these risks can deliver major rewards, they can also backfire, leaving your brand looking out of touch. Brand teams should start with social managers who already actively participate in meme culture and the latest trends to avoid missteps.

Considerations While Using Memes

Memes are constantly shared, so you may assume those images are all free and permissible to use. But, some memes are covered under copyright laws, so using them without authorization can pose a legal risk to your organization. 

Brands that use memes should speak with a lawyer or legal team before creating their strategy. A legal team can help you respond appropriately to a take-down letter or request for licensing fees. Plus, they can help you decide which memes are less risky to participate in and which memes to avoid. 

You’ll also want to consider informing customer service agents or people who respond to your social media comments when you plan to post a meme. Memes can generate a huge response, and whether positive or negative, you’ll want to be ahead of the curve to let your response team know when response volume might increase. Getting PR involved can help avoid or alleviate any missteps, too. 

Smaller companies may have an easier time adding memes to their social media strategy, but that doesn’t mean big brands need to avoid meme content entirely. Having a plan for dealing with meme response can help your team effectively manage an influx of attention. 

Tips on Creating Memes That Enhance Your Brand

Messing up with memes can be embarrassing, but the rewards of a well-timed meme can’t be denied. It’s hard to resist memejacking (or repurposing memes) when they can have such an explosive impact on your brand’s success. 

Here are 5 tips to help you do memes right.

1. Take a Risk

Memes often succeed when they have a more subversive or anti-establishment feel. Corporate, wholesome content can fall flat on younger audiences.

The best memes poke fun at a situation, so it pays to take a risk and explore the funnier side of your brand voice.

Think about how your brand voice would sound at happy hour. A small step away from a polished brand voice can be a fun surprise for younger audiences.

Brands that do well with memes have a tone that feels like someone has “taken over” the brand’s social media channels and is doing something their manager might not totally approve of.

A youthful, playful vibe goes a long way when you’re sharing meme content. 

2. Target Your Existing Audience

A campaign aiming to attract a whole new audience with memes often falls flat. Why?

Because you’re probably not looking at the young people already following your brand. 

Look through your followers and see the content your existing audience shares.

Get a feel for what they find funny. They already like your brand, so you’ll want to attract more young followers like them.

To do that, you want to make sure you target them first.

If you’re struggling to engage a Gen Z audience, consider finding a Gen Z influencer that can help create content and offer insight into what appeals to this audience.

Many traditional meme templates may engage a Millennial audience but leave Gen Z feeling like your brand is behind the times.

3. Be Timely

Memes definitely aren’t evergreen content, so they may play a different role from other social content in your strategy.

If you schedule meme content for a week later, you might discover that the meme you share is already outdated.

The best meme strategies are timely and relatively spontaneous – like Barkbox creating these memes in time for the Superbowl!

When you see an opportunity to engage with a meme, jump on it as soon as possible.

If you’re concerned about the potential response or backlash, you can add a meme to your Instagram Stories to test the response before including it in your grid.

Some weeks you may create the perfect meme and your audience will love it. Other weeks, you might not find anything on-trend that fits with your brand.

Don’t force meme content to fit with a posting schedule. Make it a valuable but irregular addition to your strategy instead. 

4. Make Sure You Understand the Joke

One of the benefits of memes is showing that you’re in on the joke. But without the right context, your brand can easily miss the point of the meme. 

If you’re using a more traditional meme, always check KnowYourMeme.com before posting to get a thorough understanding of the content.

For newer trends, find other creators using the same meme to confirm that your interpretation makes sense.

Doing your homework may take time, but it can save your brand a lot of embarrassment and help you avoid becoming a viral meme fail.

5. Stay on Brand

Introducing humor when it’s not a fundamental part of your brand voice can be tricky.

It’s crucial to keep your branding in mind to avoid losing followers when a meme flops.

It may help to separate your brand voice from your marketing messaging before you start adding memes to your social media strategy.

Once you post a meme, you’ll want someone with the same sense of humor available to respond to comments, too.

Your meme can be even more impactful if the comments section is full of on-brand, funny responses to comments.

Kick Your Social Media Marketing Up a Notch

Memes are a great way to add spice and variety to your social media channels. Adding memes to your existing social media strategy can take time, but a slow introduction can help you find the humor in your brand’s unique voice. Brands that use memes well have a huge opportunity to go viral and attract new audiences, so it’s worth the effort to use memes!

Do you use memes on social media? Share your tips in the comments!

[sc name=”pin-me-tailwind-create-cta”]

Memes are popular all over social media, and you may be wondering how to get in on the trend. Read our tips for incorporating memes into your brand content!

Pinterest Statistics for Marketers to Know in 2021

Shows Total Saves and Total Followers in Pinterest analytics on a blue background

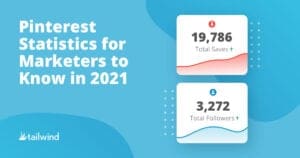
There’s nothing we love more than an interesting statistic – especially when it’s data that helps us adjust our marketing strategy or think about audiences in new ways.

The Pinterest statistics below are no exception – tell-tale signs of platform growth, user behavior and interests across different demographics can really help you fine-tune your approach to marketing on the platform. Or maybe it’ll encourage you to finally take the plunge and get started on Pinterest!

Skim this roundup of data and insights – and prepare to be amazed!

Pinterest Statistics to Pique Your Interest

  1. The average visit duration to Pinterest (as of April 2021) was 4 minutes and 48 seconds.
  2. Men on Pinterest grew 48% year over year in 2020 
  3. Top trends for Gen Z include “cottagecore fashion”, with a 80x increase in searches.
  4. Top trends for men include “kitchen storage solutions”, with a 7x increase in Pinterest searches.
  5. Top trends for millennials “fun couple activities”, with a 30x increase in Pinterest searches.

These statistics are not only interesting, they reveal an important marketing advantage. Pinterest can be a great platform for any B2C business, especially with target audiences spanning multiple gender and age demographics!

  1. Pinterest ads see a 2.3x lower cost per click than other social media ads.

Speaking of ads, one niche in particular is getting more and more creative with their Pinterest ads: food! 

As we noted in our 2021 Pinterest Trends Report, searches for “gourmet food plating,” “food garnishes” and “bread art” skyrocketed this year.

Ready to use Pinterest to meet your marketing goals? Try out Tailwind’s social media management tool for free! You can create stunning Pins in seconds, schedule them to go out at the best times, and analyze your Pin performance – all in one place!

[sc name=”mnc-create-visual-cta-abbreviated”]

Pinterest Growth Over Time

  1. In 2016, Pinterest had 128 million mau(monthly active users), in December 2020, Pinterest had 459 million mau!
  2. In 2020 Pinterest grew 37% globally! 
  3. Women still make up over 60% of Pinterest platform
  4. Gen Z users grew 50% YoY on Pinterest

Pinterest Statistics for Marketing

Pinterest Statistics for Business

Pinterest doesn’t just generate interest for your brand or business, it’s extremely effective at converting! Check out the stats below:

  1. Pinterest conducted a study showing that positivity has a bit impact on brands that they remember 
  2. 85% of weekly pinners bought “based on Pins they see from brands” 
  3. People who use Pinterest spend 80% more in retail than those who don’t use it
  4. Pinterest is an attractive platform for the “decision makers” in their homes, those with purchasing power
  5. ⅔ pinners say that Pinterest is where to go to find their ideas, products or services they can trust
  6. Pinterest shopping time is highest of any social media platform (25%)

Pinterest User Stats & Demographics

How Pinterest Can Work For You

Pinterest can have immense values for businesses and brands looking to connect with their audiences, drive traffic to their sites and even sell on Pinterest.

More and more audiences are finding Pinterest and using it to search for ideas, inspiration and even products they love. And it’s easier than you think to get started! Especially when you have a smart marketing assistant in your corner – like Tailwind!

Whether you’re looking to create hundreds of personalized Pin designs for your industry and/ or content type (psst… all the Pins featured in this article are available templates in our Create tool), or find out more information about the type of Pins that are working best for you, Tailwind can help you manage your Pinterest marketing – and your other platforms, too!

Curious? Give it a try for free!

[sc name=”mnc-create-visual-cta”]

[sc name=”pin-me-tailwind-create-cta”]

Are you interested in testing out Pinterest for your marketing goals? Here are some statistics to get you excited about using Pinterest for marketing your business!

Do’s and Don’ts of Pinterest Pin Design

A Pin with 5 Graphic Tees Perfect for Spring with arrows indicating important parts of the design against an orange background

Designing Pinterest Pins is an art and a science. There’s no one right way to do it, but let’s be honest; there are plenty of wrong ways to do it!

If you want to catch the eye of your target audience while they’re scrolling through hundreds of Pins per minute, it really helps to know a little something about aesthetics and design.

But don’t worry, you won’t have to go to art or design school to learn the tricks you need to know!

Take a look at a few of our Do’s and Don’ts of Pinterest Pin design to help you find the most success when creating Pinterest Pins.

Pinterest Design Do’s:

1. Pay Attention to What Colors Go Together

If you’re unfamiliar with the color wheel, it’s time you get acquainted. The color wheel can help you when designing pretty much anything by showing you which colors go best together, and the different combinations you can use to make your own color palette.

Having this handy whenever you’re designing Pinterest Pins can help you decide which colors to use for your Pin (and avoid colors that don’t quite mesh well together).

2. Choose Fonts That Go Well Together

Just like colors, fonts have pairings that go very well with one another. You’ve just got to know which font pairings work well on Pinterest Pins, and which ones don’t!

But don’t worry, it’s not rocket science. In fact, here are a few to get you started! (And if you have a little extra time, check out our post on Font Psychology to learn more about each font family and what effect they can have on your viewer!)

Fonts that Go Well Together

Usually it’s better to pair San-Serif fonts with Serif fonts. The contrast makes the Pin look fresh and modern without distracting the viewer!

  • Open Sans Extra Bold and Libre Baskerville
  • Ubuntu and Lora
  • Playfair and Josefin Sans
  • Oswald Heavy and Merriweather
  • Montserrat and Cardo
  • Nunito Black and Lora
  • Oswald Heavy and Old Standard TT
  • League Spartan and Libre Baskerville
  • Open Sans Extra Bold and Lora
  • PT Sans Bold and PT Serif
  • Lato Heavy and Merriweather
  • Montserrat and Playfair Display
  • Raleway Extra Bold and Merriweather

Of course, you can always go the Serif/Sans-Serif Route, too. Take a look at some suggestions.

  • Cardo Bold and Josefin Sans
  • Merriweather and Source Sans Pro
  • Roboto Slab Bold and Open Sans
  • Lora and Source Sans Pro
  • Libre Baskerville and Montserrat
  • Roboto Slab Bold and Roboto
  • Playfair Display and Open Sans
  • Merriweather and Open Sans
  • PT Serif and Open Sans
  • Source Serif Pro and Source Sans Pro

Perhaps you want to use a script font, which is a popular choice for a lot of bloggers.

  • Yellowtail and Open Sans
  • Abril Fatface and Josefin Sans
  • Lobster and Arimo
  • Shadows and Roboto
  • Pacifico and Arimo
  • Sacramento and Montserrat Light
  • Lobster and Open Sans
  • Pacifico and Josefin Sans

3. Use High-Quality Images

One major aspect of Pinterest Pin design is the image. It’s all about the image on Pinterest. If your Pinterest images aren’t up to par, you won’t get nearly as much traffic as you could be getting.

Because Pinterest is all about images, you need to step your image game up and either take your own stunning high-resolution photos, or get some professional stock photos.

The best option is, of course, to take your own photos so that they’ll be unique and you know no one will have the same Pin image as you. You can even take amazing Pinterest photos on your phone!

But if that’s not an option, the stock photos are a great option. If you want images that not everyone has access to, consider using photos that require a license.

Just be careful about the ways you can use the photo. Make sure to read all of the requirements (like attribution requirements it might have) before you use it in anything. Otherwise, you could get fined or be forced to suddenly stop using the photo.

4. Use a Pinterest Template

If you know absolutely nothing about Pinterest Pin design, take a few pointers from the pros and use a template designed by an actual graphic designer. With design tools like Tailwind Create, you can find dozens of Pinterest templates that you can use to get you started.

Pick a few you like and play around with them until you’re satisfied with the way they look! You can filter templates by content type, industry and even number of photos!

[sc name=”mnc-create-visual-cta-abbreviated”]

Pinterest Design Don’ts:

1. Ignore the Description 

While it might not seem like a part of the design, your Pin description is still crucial to your success on Pinterest. The best descriptions use keywords (think Pinterest SEO) and describe accurately what the Pin is about and what people will learn about or what they can get if they click on it.

Make it juicy, though. Hold nothing back because you’ve got a lot of competition. So bring your A game when it comes to writing the description!

Be descriptive, but playful. Let your personality come alive through the words you write.

2. Forget About Branding

Branding on Pinterest is just as important as branding on your website. Remember to add something that shows off who your brand is and gives people something to remember.

There are a few ways to incorporate branding into every Pin design without limiting the actual creative style of the Pin.

The easiest ways are to use your brand colors, and add your brand logo to your Pin. If you don’t have a logo, add your website somewhere on your Pin.

3. Be Afraid to Experiment

Pinterest Pin designs are going to evolve over time as new design elements become more popular and other ones fall out of fashion. For example, minimalist Pin design is a current trend!

So, don’t be afraid to experiment with design elements and ideas you think might be making their way to the forefront of things. That way, you’ll already be ahead of the curve and people will look to you for inspiration. If you need inspiration, check out our 2021 Pinterest Trends Report!

How cool would it be to be featured on a list of Pinterest Pin designs that did it right?

4. Forget the Call to Action

Speaking of calls to action, don’t forget that either. Otherwise, what’s the point of Pinning on Pinterest? The goal is to get people to buy something, download something, or try something. So make sure you let them know exactly what it is you want them to do.

Some call to action ideas include:

  • Leave a comment if…
  • Share this with your friends
  • Pin this now
  • Make this
  • Click here to become a…
  • Sign up and discover how
  • Does this happen to you? Find the answers by clicking here…
  • Not getting the results you want? This can help…

If you want to create scarcity and urgency, here are a few more for you.

  • Hurry
  • Today only
  • While supplies last
  • Time’s running out
  • Are you doing this wrong? Click here to find out.
  • Last chance to get this
  • Only X days left
  • Don’t make this huge mistake – fix it by…
  • Act now
  • Fast
  • Immediately

5. Forget About Cool Design Elements That Boost Engagement

One design element that can boost engagement is an arrow that points to your call to action (CTA). Using one of these can drive up your click through rates.

Not only should you include a CTA in your Pin design, like “Get This Look!” or “Shop Now!”, you can also add design elements like arrows to draw the eye to the CTA.

Creating Stunning Pinterest Pins with Ease

Creating beautiful Pins doesn’t have to be quite the headache you imagine. In fact, it can be pretty fun and easy with the right tools, like, say, Tailwind Create. With Tailwind Create, you can create gorgeous Pinterest Pins that really pop. Go preview dozens of design ideas you can personalize and brand to make your own!

[sc name=”mnc-create-visual-cta”]

[sc name=”pin-me-tailwind-create-cta”]

When designing Pinterest Pins, there are some do's and don'ts to keep in mind. Find out what you should be doing to make a Pinterest Pin here!

The Story of Pinterest Idea Pins (aka Story Pins)

An image of a jewelry Idea Pin on Pinterest from Homemade Jewelry. It is on two iphones over a dark red background.

Pinterest’s user base has grown to over 475 million monthly active users.  Gen Z and Millennial Pinners are joining in record numbers, effectively changing the makeup of the audience. And Pinners have  spoken! They want to engage with video and explore content right on Pinterest. 

So, today, Pinterest introduces Idea Pins – their multi-page format (formerly called Story Pins)! Now anyone with a business account* can create inspiring content and interact with their audiences, building more engaged communities right on Pinterest. 

Idea Pins and new tools for their creation make it easy to publish professional-looking, saveable, engaging content directly on Pinterest.

Welcome news to anyone who may have spent more time than they’d like to admit in creating these super-engaging Pins! Been there.

The new tools make it so much easier.

“We believe the best inspiration comes from people who are fueled by their passions and want to bring positivity and creativity into the world. On Pinterest, anyone can inspire. From creators to hobbyists to publishers, Pinterest is a place where anyone can publish great ideas and discover inspiring content. 

We have creators with extraordinary ideas on Pinterest, and with Idea Pins, creators are empowered to share their passions and inspire their audiences. By helping people on Pinterest spark creativity, try new things, build confidence, and be themselves, we believe creators are truly helping with our mission of bringing inspiration to create a life you love.”

Evan Sharp, Co-Founder, Chief Design and Creative Officer, Pinterest

The Origin “Story” Behind Idea Pins 

Behind every good idea, there is a story – only, in this case, it’s Story Pins! In September 2020, Pinterest launched Story Pins with a small group of creators.

Creators and Pinners alike helped evolve the format to include new features and functionality to make it what it is today.

Why “Idea” Pins?

Your Ideas and inspiration make Pinterest special. Now, because Idea Pins are shared in more places on Pinterest, creators can easily build an audience right on Pinterest. 

Starting today, Pinners in several markets will see Idea Pins from creators they follow at the top of their home feeds.

Idea Pins also appear in search, the Today Tab. 

Idea Pins include everything a Pinner might need to act on your idea right on Pinterest – whether that’s trying a new recipe, craft, hairstyle, workout, or, well, anything else! 

Idea Pin Performance

Because Idea Pins are so engaging and actionable, Pinners are indeed engaging! Pinterest found that in the past month, Idea Pins averaged 9x the comment rate of standard Pins**.

Here at Tailwind, we found that Idea Pins averaged 41x the saves of a standard Pin***. Clearly, they are a hit!

And why not? There’s nothing quite as inspiring as watching a great idea take shape right in front of you.

New Tools Make Idea Pins Easier

All of this becomes easier with brand new publishing tools including, video-first features, fresh editing tools and updates to make creating Idea Pins easier and more creative.

 Idea Pin creation now includes:

  • Record and edit video for up to 20 pages of content.
  • Voice-over recording.
  • Background music options.  
  • Ghost mode transition tools (perfect for those before-and-afters!)
  • Detail pages for instructions, tools, or ingredients
  • Interactive elements like people tagging (working with a brand!?) and stickers
  • Multi-draft save keeps your in-progress Ideas safe
  • Export options to share content beyond Pinterest
  • Topic tagging to help get your content to the right people at the right time.

“As a Creator, Idea Pins give me a way to truly share the message of the content that I create with the world. It invites and encourages personality and creativity to transform a static Pin into something that captures the audience.

In the end, Idea Pins allow creators to shine and connect with their audience on a level never seen on Pinterest before.” –

Domonique Panton, Pinterest Creator and elite track and field athlete  

Supporting the Success of Creators on Pinterest

In addition to the new Creator Code and moderation features and the content claiming portal Pinterest announced last month, you’ve likely noticed Idea Pins and other created content appearing front and center on Creator profiles. 

Keep an eye out for analytics updates that will help creators learn more about what content engages their audience.

A new Followers and Profile Visits number will show how Idea Pins are deepening engagement on your account.

It’s also easier to see engagement metrics such as Saves, comments, and reactions, which can impact the distribution of your content.

Monetizing Idea Pins

Because Pinterest is crucial to the business success of many creators, and because typically that has resulted from Pinterest sending traffic to a creator’s website or blog, Pinterest is testing adding monetization options to Idea Pins. 

Pinterest introduced their first-ever Creator Fund last month and have begun testing creator and brand collaborations with a few creators including Domonique Panton, Peter Som, and GrossyPelosi.  

They’re also testing product tagging within Idea Pins so creators can make their content shoppable. Meaningful and scalable monetization is the goal, and we’ll learn more about the details in the upcoming months. 

Need Some Idea Pin Inspiration?

Get expert tips on building your audience from fashion editor Caroline Vazzana and pro athlete Domonique Panton at Pinterest’s Creator Workshop on May 27th. You’ll also get updates, including announcements directly from Pinterest. See you there?

You won’t want to miss Pinterest’s 3-day virtual event May 24-26th. Drop into live-streamed, studio-style sessions directly on Pinterest with a Creator where you can make or do something alongside your favorite creators!

The schedule of events will appear in the Pinterest app in the “Live” tab, here. Pinners can ask questions in the Comments section of the app, which the host and participants will answer live.

You can also check out this Pinterest-curated Board with great Pins to inspire your own Idea Pins.

Idea Pins: Next Steps

Register for the workshop, but don’t put off Idea Pins another day. New formats mean less competition, which means more distribution and audience growth for you now. Idea Pins live forever, so the work you do today can pay off for months and years to come. 

Have you created Idea Pins? Share a link to yours in the comments!


*Idea Pins are available to all creators in the US, UK, Australia, Canada, France, Germany, Austria, and Switzerland.

** Pinterest Internal Data, Global, April 2021

**20m Pins by paid Tailwind members in March-April 2021


[sc name=”pin-me-tailwind-create-cta”]

Pinterest Idea Pins (formerly called Story Pins) are now available on Pinterest. Read about the change and what else Pinterest is doing to support Creators!

Essential Guide to Pinterest Templates (Make Your Pins Pop!)

An image of an editable purple Pin template in Tailwind Create with a girl in a purple shirt sitting on a ledge

Pinterest templates are an incredible resource for marketers looking to promote their products, ideas and content on Pinterest without spending a ton of time branding and styling Pin designs from scratch.

This isn’t to say all your Pins should look the same; you should always be creating fresh Pins and content for Pinterest. However, a set of well-crafted templates can help you create beautiful Pins that showcase your photos and content while keeping your branding intact.

A good way to think about this is having a set of templates for every type of content you produce.

Whether you’re designing Product Pins, promoting a blog post, or sharing a quote, you should have at least 1-3 Pinterest template designs suited to that format. That way, you can customize a set design around your photo and content – not the other way around!

Plus, having multiple Pinterest templates available (for, say, promoting your blog post) means that you’ll have visual variety for your created Pins. If you have just one template that you use, your Created tab on Pinterest is going to look awfully boring!

Ok, now you know why Pin templates can really help your boost your Pinterest marketing. Let’s dive into the specifics of what to include in Pin templates. We’ll also go over where and how to make them!

[sc name=”mnc-create-visual-cta-abbreviated”]

What to Include in Pinterest Template

One of the main advantages of creating Pinterest templates is that you have branded resources for promoting your content and products on Pinterest at your fingertips! And, they’re fairly easy to make!

Here are the main elements you want to include a space for in your Pin design:

  • Pin image
  • Pin Title
  • Subheading and room for copy
  • Background
  • Additional Design Elements
  • Branding 
  • CTA

You’ll also want to make sure that your branding is emphasized throughout your template.

This means incorporating your color palette, branded fonts, and a logo or website!

How to Create Pinterest Templates

There are a lot of design tools out there you can use to make beautiful Pin images, like Canva, PicMonkey and editable templates purchased from Creative Market!

You’ll simply choose a design you like, and customize the elements of the Pin to match your image and branding. In order to create a robust Pinterest template library, you may have to spend a few hours hunting for your favorite designs that work for your content types and then customizing each with your branding.

Or, you can start from almost done with Tailwind Create! 

Our smart visual designer will generate templates in one click based on your industry, branding, or even the color palette of your photo!

It’s a huge time saver, and helps you generate thousands of personalized designs for Pinterest (and your other social platforms!) in half the time. 

Here’s how to use a personalized Pinterest Template in Tailwind Create, step by step and save hours of design time:

Designing multiple Pin templates with Tailwind Create tool
  1. Add Your Pin Title
  2. Add the web address you want to pull your photos from or upload them from your computer
  3. Click Create in the bottom right corner
  4. Browse thousands of curated Pinterest templates generated with your images, title, and branding
  5.  Filter the list by photo count and/or category to find the perfect template for your Pin
  6. Click Edit to make changes to photos, text, color, or branding on any Pinterest template
  7. Select your favorite personalized Pin designs, and hit Review Selection in the bottom right corner when you’re done
  8. Download your Pin images or click “Go Schedule” to add them to your Tailwind Pinterest scheduler

It couldn’t be easier to create personalized social media posts in half the time with Tailwind Create. See what others have created with our tool!

How to Stand Out on Pinterest with Beautiful Pins

When building or using Pinterest templates, there are a few tips and tricks you’ll want to keep in mind on how to make your Pinterest Pins beautiful!

1. Choose a Professional-Looking Image

Image quality is key when it comes to Pinterest Pins. After all, would you click on a Pin with blurry, pixellated images, or snaps taken in low-quality lighting?

Clear, crisp images draw Pinners’ eyes, and showcase your products or topics really well in the busy Pinterest feed! They help tell a story – maybe even before your viewer reads the Pin Title – and can make or break the decision to click.

And, did you know that you can get professional-looking pictures for your Pins right on your phone? Check out our FREE phone photography webinar for more details!

[sc name=”ivory-mix-webinar-evergreen”]

2. Choose Your Pin Background

Next, you’ll want to choose the background of your Pinterest template. Generally, when you create a Pin with a large block of text, you want to choose a background that doesn’t distract from the text or make it difficult to read – like a solid background color. Minimalist Pin designs work particularly well for this! 

Images can also make for good backgrounds to Pins without a lot of text. You’ll want to choose a simple photo for your background, with plenty of white space for your copy.

If your photo doesn’t have white space, consider adding a text overlay to your Pin so that the text is clearly readable. You should also make sure your text is high enough contrast to be easily read on a screen.

This not only helps your Pinterest audience, it helps Pinterest itself understand exactly what your Pin is about!

3. Draw Users in With Pin Titles

Pin Titles tell your users exactly what your Pin is about – and did you know they tell Pinterest what it’s about, too?

Pinterests’ visual AI tool can read the text on your Pin – well, some text. It really struggles with script and handwritten fonts, so even though these are cute, they don’t help Pinterest SEO.

And trust us, you really want to optimize your Pin designs with Pinterest SEO in mind. When the algorithm (and your users) have a clear understanding of what your Pin is about, it will surface in relevant search results for Pinners interested in that topic. That’s more eyes on your content, and more traffic to your site!

To make a design-friendly Title that hits the points of Pinterest SEO, include your main keyword or topic in your Pin Title, and fight the urge to make it too long. A short, snappy title doesn’t detract from your Pin image or take up too much space in the design, while getting the point across.

You can use up to 100 characters in your Pin Title! 

4. Include Your Branding on the Pin

If you think about it, the Pinterest feed is filled with hundreds of Pin images side by side, each inviting Pinners to click and learn more. If you’re interested in building engagement and a loyal following on Pinterest, subtle branding touches on your Pin can help!

If you have a brand logo, consider including it on your Pin in the corner, or at the bottom of your Pin. 

If you don’t have a logo, include your website address. This helps users know who made the content, and where to go for more things like it!

Want more information? Read our in-depth guide on creative best practices for Pin design!

Pinterest Pin Template Examples from Tailwind

How Often to Post on Pinterest?

You may be wondering how often to post on Pinterest, and looking for information on the best days to post on Pinterest. Well, we have some good and bad news for you here!

The bad news is there is no best time to post on Pinterest. The good news, is that any time could be a good time to post on Pinterest. The key is not posting at the right time and date, but perfecting your Pinning consistency. Here it is from Pinterest themselves:

It’s a good idea to save Pins regularly—consistent, daily activity is better than a once-a-week flurry. Be patient and stick with it.

Unlike social networks where all of your audience reach typically happens in the first 24 hours, the reach of your content on Pinterest will continue to grow over time as Pinners discover and save your Pins. Publishing consistently over consecutive months is the best way to build a dedicated audience.

Pinterest

Our recommendation is to look at how much time you have to commit to generating content to Pin, so that you always have a consistent flow of Pins to your boards.

“There’s no point in pinning 100 times per day if you don’t have the time and content to fill those slots from week to week. You want to be able to set yourself up to maintain a flow of relevant and quality content.”

Taylor Hall, Tailwind Customer Success

That’s where our Tailwind Pinterest scheduler comes in handy – so that you can experiment and find the pinning schedule and cadence that works best for your audience.

If you have the time to publish 10-15 new Pins every day, try it for a while and monitor your engagement with our Pinterest analytics tool. From there, you can make the choice to scale your Pinning rate up or down, or make changes to your Pinterest content!

The sweet spot may take some sleuthing to find, but you’ll be rewarded with more engagement on Pinterest and better performance of your Pins – and Tailwind is here to help!

Plus, our Tailwind Create tool enables you to publish all your freshly designed Pins to your Pin queue in one click of a button, saving you a ton of time! Curious? Try it out today!

[sc name=”mnc-create-visual-cta”]

[sc name=”pin-me-tailwind-create-cta”]

Everything you need to know to turn your Pinterest templates into traffic and generate interest in your brand is here in our guide!

Top Tips for Creating Great Pinterest Story Pins

A Pinterest Story Pin on an iPhone on an aqua background.

Pinterest Story Pins have finally arrived and we’re definitely here for it. Story Pins are a whole new way to engage your audience other than the comments feature. Like Instagram Reels, Story Pins are animated photos or videos that give users helpful information, while entertaining them in ways they didn’t even know they could be entertained on Pinterest.

So what are Pinterest Story Pins and how can they help your business?

Let’s take a look.

What are Story Pins?

Story Pins are a cool, new way to get your audience engaged on Pinterest. Similar to the Stories features on other top social media sites like Facebook Stories and Instagram Stories, Pinterest Story Pins allow creators to present a series of images or videos that can be tapped through.

Story Pins are great for recipes, brand stories, product details, travel guides, and recommendations.

They’re also great for boosting engagement on Pinterest because they allow viewers to react to your Story Pin quickly with reactions like “Thanks,” “Love,” “Wow,” and “Great Idea!”

How to Create a Story Pin

Before you create great Pinterest Story Pins, it helps to know exactly how you’ll do it.

Create Story Pin on the Pinterest dashboard

Step 1 – Log into your Pinterest business account and click Create Story Pin.

Step 2 – Click the downwards arrow and choose up to 20 images or videos (or drag and drop them).

Step 3 – Design your pages using the tools on the right side of the screen. Choose a layout for your page and decide what color background you want. To adjust your image or video, click Image or Video and adjust or resize to your preference.

Step 4 – Click the plus sign icon on the top left-hand side to add more images or videos. If you want to change the font, background, or layout of multiple pages at once, hold down the shift key and select the pages you want to edit.

Step 5 – Click Next and choose a theme from the dropdown menu. Then, add the details to your Pin.

Step 6 – Fill out all of the information for your Pin, including the Story Pin title, which board you want to Pin it to, and which 10 tag topics you want to add to your Story Pin to reach people searching for similar ideas.

Step 7 – Click Publish and you’re done!


Related Reading : The Ultimate Pinterest Image Size Chart


Why Use Story Pins for Business? 

Businesses can benefit from using Story Pins to help make their content more discoverable on Pinterest. Story Pins can be seen by your followers at the top of their feed, giving you a great spot right at the top of the Pinterest app. It also helps businesses be discovered by people who aren’t already following them.

Thanks to the Discover Creators icon in the Story Pin section, users can find new and inspirational content, which might include you and all that you offer on Pinterest and beyond.

When people hear information, they’re only likely to remember about 10 percent of that information three days later. However, when paired with a relevant image, people retained 65 percent of the information three days later.

So if you want people to remember what you’ve said, pair it with visual images or videos!

Tops for Creating Great Pinterest Story Pins 

1. Tell a Compelling Story

If you want to be successful with Pinterest Story Pins, make sure your Story Pins tell a compelling story. Whether it’s a brand story or a case study of clients using your product or service, make sure it captures the attention of your target audience and gets them to act on your Story Pin. Plan out your Story Pins with a beginning, middle, and end.

2. Upload High-Quality, Eye-Catching Images and Videos 

Visual content is an incredibly effective way to reach your target audience on social media platforms like Pinterest. In fact, between 40 and 80 percent of businesses will rely heavily on visuals as part of their marketing strategies in 2021. That means, in order to compete, you’ll need to create high-quality, eye-catching images and videos in your Story Pins. Otherwise, you might not get the results you’re looking for.

[sc name=”mnc-create-visual-cta-abbreviated”]

3. Tag Your Story Pins

Pinners are 70 percent more likely to engage with product tags in scenes. So if you want people to find your Story Pins based on the topic, you’ll need to tag your Story Pins with topics to help categorize them. Doing this will help make your Story Pins more discoverable on the platform. Use the description box to provide even more context and information about the Story Pin. If your Story Pin is a recipe, you could use tags like “recipes,” “recipe ideas.” And you might use hashtags like #eatingwell, #onmyplate, or #foodforfoodies.

4. Create a Understated Call to Action

A call-to-action is something that prompts someone to take action, whether it be a click, a like, or a comment. Usually, the CTA would sound something like “Buy Now,” “Call Now,” or “Learn More.”

The CTA for your Story Pin should be subtle because you’re looking for engagement at this point, not necessarily the sale. So you don’t want it to be something that prompts the user to follow, re-pin, or share a URL to a helpful tool or resource.

5. Don’t Forget About SEO

Hashtags used to be one of the most important aspects of creating great Pins because they helped users find relevant content, but in 2020 that all changed.

Using relevant hashtags isn’t as important because their effectiveness is limited to a short, initial burst of extra exposure. So don’t spend a ton of time worrying about Pinterest hashtags. Instead, you want to brush up on your Pinterest SEO skills!

Focus on including your main topic in your Pin Title, and choosing relevant tags (up to 10) that match your content subject. You’ll also want to assign your Story Pin to a relevant Pinterest Board!

 6. Make it Human

Story Pins are a great way to let people get to know the creator behind the content. Show your followers and other users that they can relate to you and your brand. You could show your humanity by narrating your idea or showing your face.

Doing this can help Pinterest users connect with you in a truly authentic way. So find ways to connect with your audience in a way that shows your humanity.

You could try sharing your fails as well as your wins. Or you could show your audience some of the top struggles facing business owners and creators (like you).

Don’t be afraid to be vulnerable and really show people that you’re just like them.

7. Check for Quality

Story Pins are meant to feel more authentic, which means quality is key. That means you need to check your borders to ensure the edges of the screen aren’t covered. Is the lighting the best it can be?

Remember, natural light can do wonders for a photo or video. Think about whether the videos and images in your Story Pin fit well together style-wise? If not, consider using filters or switching the style up a bit so that everything meshes well.

Make sure the images and video are high-resolution and that the focus isn’t blurry (it should be crisp, clear).

Types of Story Pins to Create

There are a few types of Story Pins you can create to help boost engagement and reach:

  • Listicle Story Pin (i.e., 7 Places to Find WFH Opportunities, etc.)
  • The How-To Story Pin (i.e., How to Start a Business From Home in 2021)
  • A Day-in-The-Life Story Pin (i.e., A Day in the Life of an Instagram Influencer)
  • The Mental Health Story Pin (i.e., mental health reminders for remote workers or essential mindset tips to help you work from home successfully)
  • Behind the Scenes Story Pin (i.e., A Look at How Your Product is Made from Start to Finish)
  • The Answer Your Own Question Story Pin (Ask a question, like “Can I really design the life I’ve always dreamed of?” and then answer it with your content)

Examples of Great Pinterest Story Pins

Wanna know what a great Story Pin looks like? Take a look at three top examples from business accounts using Story Pins like pros.

The recipe Story Pin from Scott Can Eat makes great use of video to engage Pinners, by giving them something beautiful and colorful to look at, as well as providing on-screen instructions. Bonus points: It’s super easy to make – and tasty, too!

WendysWorld_XOX created a tutorial that shows users how they can achieve an editorial makeup look with an ombre lip. She uses high-resolution video to showcase the steps, and includes an understated CTA to get viewers to follow her.

Finally, Glamour UK uses an easy-to-read listicle format to engage users and teach them about financial literacy. This Story Pin uses a combination of animations, images, and words to convey the point! 

Conclusion: Creating Great Pinterest Story Pins

 Creating great Pinterest Story Pins may take some time and trial and error while you test different images, captions, and videos. But the process can go a lot more smoothly if you have tools to help you create and manage your Story Pins effectively.

Tailwind Create can help you create amazing, eye-catching Story Pins that get people engaged and help you become more discoverable to both your followers and other Pinterest users! Plus, you can create stunning graphics for your other social media platforms while you’re at it – with one click of a button!  

[sc name=”pin-me-tailwind-create-cta”]

Pinterest Story Pins are the latest way to boost engagement on Pinterest, but how do you make a good one? Read our top tips and thought starters here.

How to Design Your Social Content for Accessibility

A screenshot of a Tailwind customer video with captions on it on blue background

Inclusivity is an important goal for most companies in 2021, but you wouldn’t know it from their social media content. 

While most social media platforms have tools to improve accessibility, many creators overlook these essential resources. By ignoring accessibility best practices, you may be hampering your reach, going against your company’s values, and missing out on great engagement by not making your content more inclusive.

Lots of people assume that Pinterest, Instagram and Facebook aren’t set up to meet accessibility needs. Think again!

There are plenty of ways to make your content more engaging for those who can’t consume it as easily. These social platforms have committed to making their platforms more inclusive for all people, and it’s a great reason to do the same!

Here’s why accessibility matters in social media, how you can create a more inclusive online community, and tips for creating more accessible content.

[sc name=”mnc-create-visual-cta”]

Why Inclusive Design Matters on Social Media

Almost every social media manager has felt the sting of lower reach after an algorithm change. However, many don’t see how they’re stepping over tons of potential viewers every day with poor design. 

Even with the most beautiful graphics, snappy captions, and on-trend videos, your design might not cater to your whole audience. Without considering people with limited sight, hearing, or reading capabilities, your content may miss the mark. 

Inclusive design ensures that everyone can reasonably engage with your content on social media. Considering that 61 million Americans alone have a disability, you may be accidentally excluding a ton of people from your online communities.

“It’s important to understand that making digital content accessible also means better marketings. As digital marketers, we naturally want to reach as many people as possible, and accessibility helps us do that.”

Alexa Heinrich, Digital Accessibility Expert and Social Media Manager

But designing for accessibility goes far beyond garnering more likes. Including all people in online communities is our social responsibility, and online community builders know how important it is to create a safe and welcoming space for customers and fans. 

As photo and video content expands across platforms, creators need to consider accessibility at every stage of the creation and posting process.

What to Consider When Developing Inclusive Communities Online

Designing for accessibility may take more intentionality than you’re accustomed to. However, a new section on a creative brief or a new box on your checklist can lead to an engaged audience you’ve never encountered before. 

Part of developing an inclusive community on Instagram, Pinterest, or any social network is thinking about how people with different disabilities access your content.

Platforms are beginning to develop equity teams to understand the needs of people with disabilities better, so the tools available to you are constantly changing.

Even so, those tools only help if you empathize with the experience of people with disabilities and understand how the tools work to enhance their experience. 

Content creators should always consider how their followers—including users with hearing and/or vision disabilities—are going to engage with their content, especially visual elements like photos and videos.

If you’re going to post an image, make sure you write alt text for it so anyone using a screen reader can access it. And of course, videos should always be captioned to make them accessible for deaf and hard-of-hearing individuals.”

-Alexa Heinrich

Social media platforms aren’t taking these recommendations lightly. For example, Pinterest took a big step in 2018 when they strengthened screen reader support, improved color contrast sensitivity, and added focus indicators to improve the user experience for those who are visually impaired.

Meanwhile, Facebook and Instagram recently added automatic captioning to video content.

Still, the steps platforms are taking are not enough to absolve businesses from responsibility.

We owe our community great content that they can consume, no matter what tools or resources they use. This is especially crucial on primarily visual platforms like Pinterest and Instagram, where most content still may not be accessible for certain communities.

Creating More Accessible Content on Pinterest and Instagram

Designing content with accessibility in mind may seem complicated at first. However, it’s actually much easier than you think. 

According to Heinrich, there are three key elements to include in every piece of social media content to make it as accessible as possible: a visual component, an audio component, and a readable text component.

You need a visual component for users who rely on their sight to consume content, an audio component for users who rely on their hearing to consume content, and a readable text component such as a written post or tweet, transcript, or image alt text for users who rely on assistive devices to consume content.”

“Readable text can also double as your audio component if a user is having their screen reader read the content aloud to them.

Flattened copy, such as text on an image or open captions on a video component, does not count because a screen reader cannot typically identify it as readable text,” says Heinrich.

Alexa Heinrich

Each component should have substance and tell a story accentuated by, but not dependent on, the other components. 

For example, many professionals use Instagram image alt text in a way that doesn’t support people with disabilities.

Instead of comprehensively describing the image for people using screen readers, some people use alt text as a duplicate image caption or an opportunity to add keywords.

This popular SEO practice can provide a bad experience for people with disabilities who rely on alt text to “see” the images in your social media post or on your website. 

Another example is using emojis in captions. Emojis have alt text connected with them, so a screen reader will relay an emoji as a word that represents the emoji. Thus, having emojis placed unexpectedly between sentences or as a substitute for bullet points can lead to confusion for those who can’t see them.

That doesn’t mean you can’t use emojis in your captions, however. Focus instead on using emojis at the end of sentences, or better yet, at the end of your caption! That way, screen readers still get your message without being stymied by random words like “tree” or “woman in lotus position.”

In cases like these, creating inclusive content involves breaking habits that we may have previously linked to higher engagement.

Three Quick Tips for More Inclusive Content

Creating more accessible content can take some getting used to. Examining your design process and adding new elements for better accessibility may seem daunting, but it can ultimately lead to a stronger online community and more successful social campaigns. 

Here are three easy ways to start designing more impactful, inclusive content today. 

1. Add Captions to Videos

All captions are good captions, right? Not exactly. 

Open captions, or captions embedded in the video file, aren’t as helpful as you may think.

As Heinrich mentioned earlier, these captions often can’t be identified as readable text. Instead, you can add the Caption sticker to your Instagram Stories to auto-caption your videos, or toggle the Auto-Generated Captions setting when you add an IGTV video.

Adding captions supports viewers who are hard-of-hearing while also providing readable text for screen readers. Plus, other viewers might appreciate your captions, too. Facebook reports that 85% of videos are watched on mute, so adding captions can pull in another audience who wouldn’t have heard your videos anyway.

2. Use Hashtags Wisely

As valuable as screen readers are, they can’t always be perfect. With hashtags, adding capitalization can make it easier for screen readers to decipher what a hashtag means. 

When a screen reader sees #tailwindapp, it will likely try to stay the entire hashtag as one word. Capitalization can clarify that the hashtag contains specific words and ensure it is read correctly for the user.

While we’re on the subject, adding 30 hashtags to the bottom of an Instagram caption or multiple in a Pinterest caption can provide a bad experience for vision-impaired users. Add hashtags to a comment, instead.

How to Add Hashtags to First Comment with Tailwind

Posting your Instagram hashtags to the first comment is a powerful tool for accessibility – and happens with just one click with Tailwind’s Instagram scheduling tool!

Here’s how you use it:

  1. Upload your photo or video to drafts
  2. Select the best time to post recommended by Tailwind’s Smart Schedule tool
  3. Write your Instagram caption
  4. Add your hashtags from the suggestions in Hashtag Finder, or add your favorite Hashtag List from saved Hashtag
  5. Check the box for “Post hashtags in first comment” (with Tailwind Auto Post enabled!)
  6. Click Schedule

It’s as easy as that! When it’s time to post, we’ll send your carefully crafted content to your Instagram, automatically populating the hashtags at the end of your caption into your first comment on the post. Presto!

A view of the Tailwind Instagram dashboard, showing the post scheduling recommended times, suggested hashtags for your post, and your caption bar with the Post hashtags in first comment selected.

3. Add Meaningful Text Captions

One word, quippy captions have become normal on Instagram and Pinterest. However, when users can’t clearly see an image, they have no idea what your post is about without meaningful context! 

Expand on the story in your image or video with a detailed, informative caption. While it may not follow the current stylistic trends, it will make a big difference in how people experience your content. Captions can be especially impactful on Instagram Reels, where video trends aren’t always the most inclusive.

For Pinterest, adding relevant information into dedicated fields (like a website address into the URL field) or details in your Pin description can ensure your caption stays easy to read.

Always focus on how content appears on the Pin before repinning other users or brands, and adjust content or formatting to match your accessibility goals. Adding clearly visible text overlays to your Pin with enough contrast to read is a great way to do this.

In fact, you can add clearly readable text overlays and appropriately contrasted color palettes to all your social media designs with Tailwind Create!

[sc name=”mnc-create-visual-cta”]

Putting Inclusivity First in Social Media Communities

As social media managers, we interact with our communities every day. Our brand is so much more than just a company, and interacting with different people is often the best part of the job. That’s why it’s our responsibility to do better and expand our community to welcome everyone. 

Designing with inclusivity in mind may take a few extra steps, but it’s well worth the effort if it means everyone has the opportunity to engage. There are many benefits to accessible design for social media, but the main benefit will always be creating a rich, strong community where no one is left out. 

Do you have any accessibility tips you use for social media? Let us know in the comments!

[sc name=”pin-me-tailwind-create-cta”]

Does your social media pass the accessibility test? Find out how to create user-friendly designs in seconds with our easy guide!