
Instagram
Required Instagram Video Sizes and Dimensions
Are you using video on Instagram to communicate, connect, and engage with your audience? Wondering what are the best video sizes and Instagram video formats
Are you using video on Instagram to communicate, connect, and engage with your audience? Wondering what are the best video sizes and Instagram video formats

Learn how to change your Instagram Story background color in just a few easy steps. From solid colors to tinted effects, these tricks will help you create stunning and brand-worthy Stories. Plus, discover how to use this feature to create custom highlight covers for your profile. Update your Instagram app and try it now!
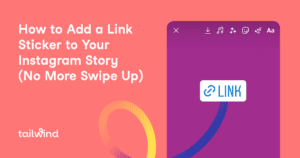
Learn how to use Instagram’s new link sticker to send followers directly to your website or landing page. Don’t miss out on this powerful social media marketing tool!

Discover how to easily create and share GIFs on Instagram using the GIPHY app. From downloading to posting, learn the simple steps to take your Instagram game to the next level with GIFs. See specifications for posting options and use our recommended tool to schedule your custom GIFs. Start captivating your followers today!

Discover how to use Instagram’s Close Friends List to your advantage in business marketing. Learn how to create a list, share exclusive content, collaborate with influencers, and show behind the scenes footage for a successful social media strategy. Click to learn more!

Learn how to easily save and download your own Instagram Story, as well as share and save other accounts’ Stories. Find inspiration, repurpose content, and keep your audience engaged with these tips and tricks. Plus, discover the legal workarounds for downloading someone else’s Story. Read now for a complete guide on Instagram Stories!

Discover the power of Instagram Stories for increasing engagement and retaining your audience. Learn how to edit, delete, and create Highlights for optimal results.
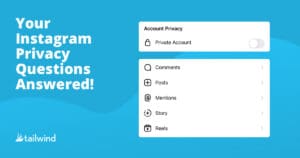
Learn how to make your Instagram account safer and more secure with these tips on privacy, blocking, muting, and preventing bot tracking. Keep your information protected and enjoy a more positive social media experience. Read on for a step-by-step guide.

Find out how Instagram Story templates can save you time and create recognizable branding for your business. Learn how to make your own templates and find free resources for templates in this blog post. Schedule your new Instagram Stories with Tailwind and never worry about creating engaging content again!

Chances are, your blog post tells a story. Whether you’ve written about a recipe, fashion, or wellness, there’s an underlying story that your reader will connect with. At heart, your life was different before and after you encountered this topic, and your blog post can help inform a reader, sway them, or in some way change their lives, too!
Start with a forever-free plan. No credit card required.

